CHAPTER 13 |
Design Tools |
Sun WorkShop Visual includes a number of tools which assist you in your task of building a user interface and linking it to your application. This chapter describes AppGuru and Sun WorkShop Visual Capture. These tools are powerful stand-alone utilities which work in conjunction with Sun WorkShop Visual. They provide a way of starting a design - AppGuru gives you the basis of a new design while Sun WorkShop Visual Capture gives you the design of an existing application.If you wish to find out more information on other tools in Sun WorkShop Visual, see the following chapters and sections:

|
Chapter 14, "Sun WorkShop Visual Replay", starting on page 435. This chapter provides information on Sun WorkShop Visual Replay which gives you the ability to record and play back the use of an application. |
|
|
Chapter 23, "User-Defined Widgets", starting on page 631. This provides information on the tool visu_config which allows you to use your own widgets in Sun WorkShop Visual. |
|
|
"Editing Pixmaps" on page 152 - for more information on creating and editing pixmaps. |
|
|
"Setting Fonts" on page 143 - for more information on selecting fonts and font sets. |
|
|
"Setting Colors" on page 139 - for more information on choosing colors. |
AppGuru provides a fast way to create a standard interface by giving you access to reusable designs, called templates. You can create your own templates and make them available to other users. Templates are created and stored in the AppGuru Designer dialog. When a template is selected from this dialog, the design it describes is automatically added to your session of Sun WorkShop Visual.Display the AppGuru Designer dialog by selecting "AppGuru Designer" from the Tools menu or by pressing the AppGuru button on the toolbar. This button is shown in Figure 13-1.
Using AppGuru templates has the following benefits:
| 1. | Styles which must be used within a company or for a particular application are enforced from the beginning. |
| 2. | Designs are pre-configured for convenience and to avoid errors. |
| 3. | The basic design of dialogs which are very similar can be re-used. |
With AppGuru Designer you can:
| 1. | Create new templates "from scratch". |
| 2. | Edit existing templates. |
| 3. | Prime a new template from your current design. |
| 4. | Select a template to add to your current Sun WorkShop Visual session. |
An optional description field in the template definition allows you to provide some information to help you and other users understand what the selected template provides, before adding it to a design.
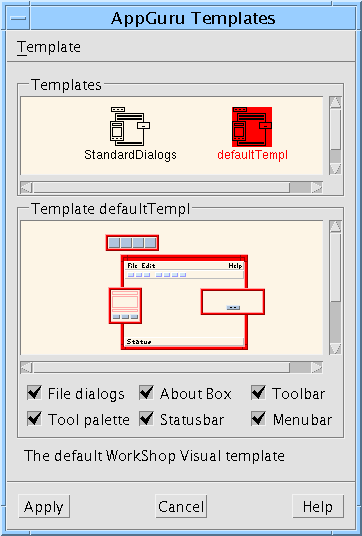
Selecting "AppGuru Designer" from the Tools menu displays the AppGuru Templates dialog, shown in Figure 13-2. This shows all currently available templates. You can load single templates (or all templates in the specified directory) into the AppGuru Templates dialog by selecting the appropriate command from the Template menu. You may also "Unload" a template. This simply removes the template from the AppGuru Templates dialog, any files associated with it remain in place.Select a template and press "Apply" to add the design described by a template to your existing design.
A template is made up of "components", each of which may consist of any number of widgets. A component in AppGuru refers to the elements of the template which may be selected and deselected from the AppGuru Template dialog. The widgets of a component define the appearance and behavior of the component.
The templates are shown in the top portion of this dialog as "thumbnail" sketches. As you select each of these, a list of the components defined for that template is shown in the lower portion of the dialog, allowing you to "switch off" any components you do not wish to be added to your design. A single component can represent several widgets in your design.
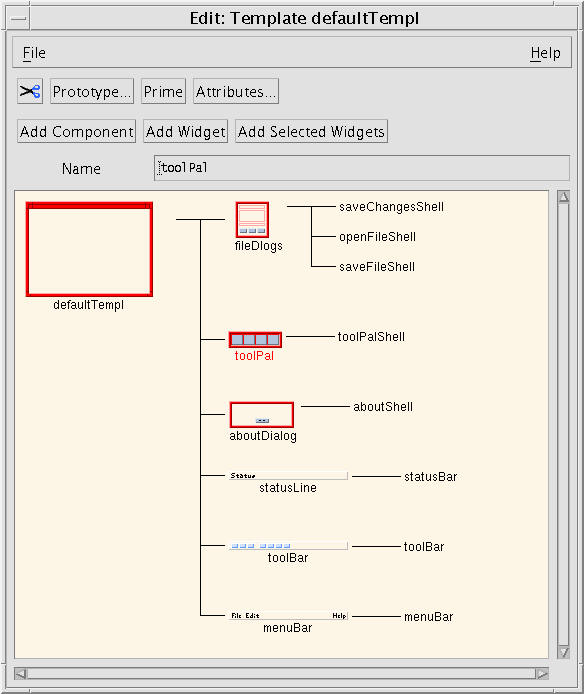
Templates are edited by selecting "Edit Template" and created by selecting "New Template" from the Template menu of this dialog. Selecting either of these menu items displays the AppGuru Edit Template dialog, shown in Figure 13-3.
This dialog allows you to:
| 1. | Edit all the attributes of the template (including all text associated with the template, the location of the design file and the pixmap file). |
| 2. | Show how the template under construction will appear in the AppGuru Templates dialog. |
| 3. | Add components to the template and remove components from the template. |
| 4. | Add widgets to components. |
| 5. | Edit the attributes of a component. |
| 6. | Save the template. |
Each of these is described below.
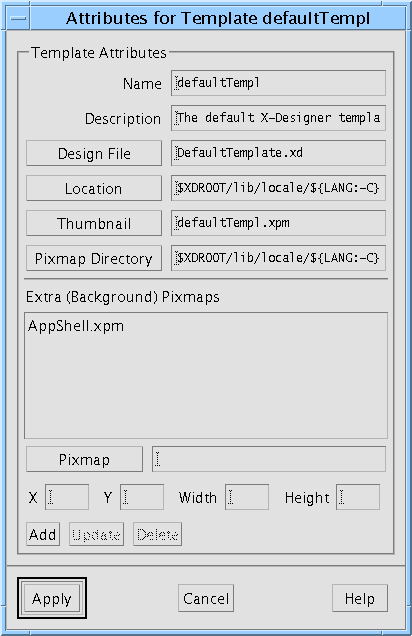
Pressing the "Attributes" button when a template is selected, or double-clicking over a template, displays the Template Attributes dialog. This is shown in Figure 13-4.
This dialog allows you to edit the following information:
|
|
The background pixmap. This is the pixmap showing the part of the template which cannot be filtered out; that is, the part left when all components are "switched off" in the AppGuru Template dialog. |
|
|
The thumbnail pixmap. This is the small sketch displayed at the top of the AppGuru Template dialog. |
|
|
The name of the Sun WorkShop Visual save file containing the widgets referred to in this template. Without this information, Sun WorkShop Visual does not have any information on the widgets and therefore cannot display them. |
|
|
The location of the template directory. You may wish to keep all your templates in the same directory because Sun WorkShop Visual can load all templates in a directory in one action. |
|
|
The directory containing the pixmap files. |
|
|
A short description of the template. This is shown in the AppGuru Template dialog when the thumbnail is selected. |
While you are editing or creating a template, press the "Prototype" button to see how your template will appear when selected in the AppGuru Templates dialog.
You may add components to a template by:
|
|
Selecting "Prime" from the Template menu. |
|
|
Pressing the "Add Component" button. |
"Prime" adds all the shells in your current design to the selected template. Each shell is one component of the template. Pressing the "Add Component" button adds one component. To remove components, simply select them and press the Cut button. There is no paste or undo facility.
To add a widget to a component:
| 1. | Select the component. |
| 2. | Select one or more widgets in your Sun WorkShop Visual hierarchy. |
| 3. | Press the "Add Selected Widgets" button. |
If the widget you wish to add is in another Sun WorkShop Visual save file or it is difficult to select in the current design, press "Add widget", select the widget and then type the name of the widget in the "Name" text field.To remove widgets, select them and press the Cut button on the toolbar. Remember that there is no paste or undo facility.
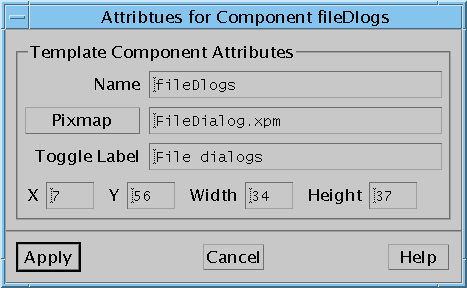
You can edit various attributes of a component by selecting "Attributes" from the Component menu and entering information into the Component Attributes dialog, which is shown in Figure 13-5.
In the Component Attributes dialog you can change the name of the component as it is displayed in the AppGuru Editing dialog. The rest of the fields apply to the component as it appears in the AppGuru Templates dialog. The pixmap named in this Attributes dialog is drawn over the template background pixmap at the x and y position given here and with the specified width and height. The toggle label refers to the label of the toggle for "switching off" the component in the AppGuru Templates dialog.
Note - The enhancements to AppGuru are backwards compatible: the former resource-based templates are fully selectable under the new system.
The File menu in the AppGuru Edit Template dialog contains items to:
| 1. | Save the current template using the current filename, if any. |
| 2. | Save the template using a different name. |
| 3. | Close the Edit Template dialog. |
The saved file is an X resource file. It is this file which is opened by AppGuru. The resource file, in turn, references the Sun WorkShop Visual design file containing the description of the template. Change the name of the design file in the Template Attributes dialog.
Sun WorkShop Visual Capture allows you to capture dialogs from a running Motif application and drag them into Sun WorkShop Visual. Whether the application has been "hand-crafted" or designed using a GUI builder, Sun WorkShop Visual Capture can create an "xd" file of the application's design.Sun WorkShop Visual Capture is available from the "Tools" menu. You can also use this tool from the command line as described in "Using Sun WorkShop Visual Capture from the Command Line" on page 434.
For successful operation of Sun WorkShop Visual Capture, the Motif application you wish to record must have been dynamically linked with the Xt library (libXt). On many UNIX implementations, you can find out whether the application has been dynamically or statically linked with libXt by typing:ldd AnApplicationIf the output mentions libXt, the application has been dynamically linked with the Xt library and can be used with Sun WorkShop Visual Capture. If this library is not present, the application has probably been statically linked with the Xt library. You will have to re-link your application with the Xt shared library if you want to use Sun WorkShop Visual Capture.Sun WorkShop Visual Capture is completely non-intrusive and will not affect either the performance or the behavior of an application.
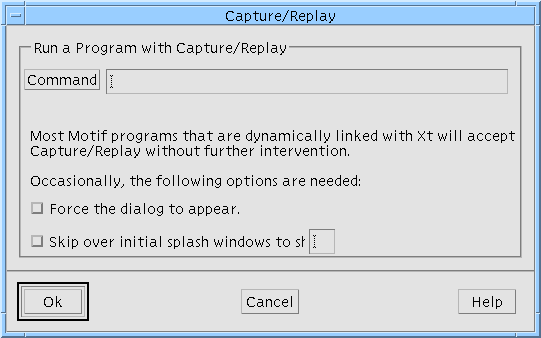
When you select "Sun WorkShop Visual Capture" from the "Tools" menu, a dialog is displayed allowing you to type the name of a Motif application to be captured into the text box next to the button labelled "Executable". There is also a text box allowing you to type any arguments you wish to be passed to the application. This dialog is shown in Figure 13-6.
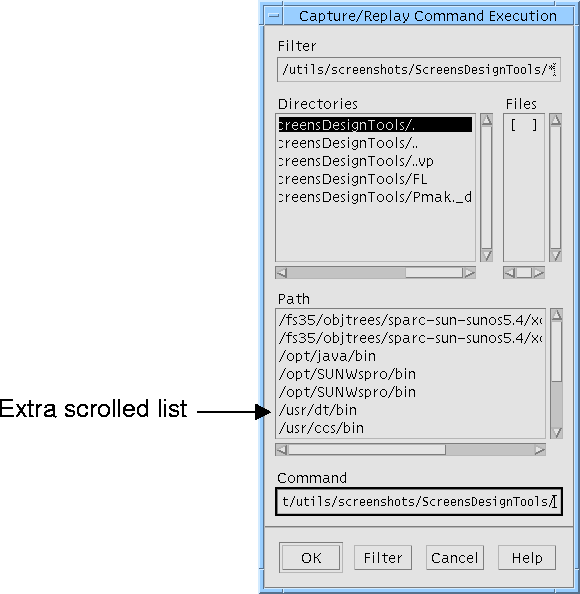
When you press "OK", your PATH is searched for the named executable. If it is not in your PATH or you are not sure where to find the application, press the button labelled "Executable". This produces a file selection box containing an extra scrolled list, as shown in Figure 13-7. Each item in this list is a directory from your PATH. This path list, however, is the path set up for you when you run Sun WorkShop Visual and may contain some extra directories required by Sun WorkShop Visual. When you exit Sun WorkShop Visual your PATH is the same as it was before running the application. When you select a directory from this list, any files in the directory are shown in the scrolled list labelled "Files".
You can also run the dialog from the command line. This is explained in "Sun WorkShop Visual Capture" on page 693.
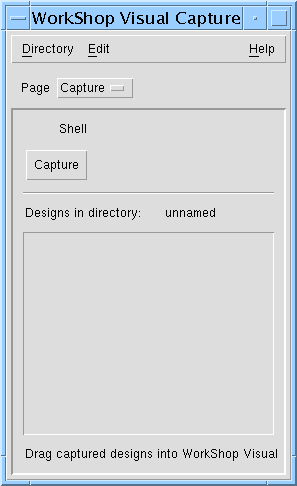
The Sun WorkShop Visual Capture dialog is shown in Figure 13-8. It has two pages - one for Sun WorkShop Visual Capture and one for Sun WorkShop Visual Replay. You can change between pages by selecting from the option menu labelled "Page". For details on the dialog when you are using Sun WorkShop Visual Replay see Chapter 14 "Sun WorkShop Visual Replay".
The text to the right of "Shell" displays the name of the currently active Shell of the associated application. This is the Shell which will be captured when you press the "Capture" button. Beneath the "Capture" button is an area containing the captured Shells in the current directory.
By default, when applications are captured, files containing the captured design are created in a temporary unnamed directory.
Note - The temporary directory (and its contents) is removed automatically when you exit the application. If you want to preserve your work, you should be working in a named directory (see below).
Use the "Directory" menu to create a new directory, open an existing one or save the current directory under a different name.When you open a directory, the dialog displays any captured designs that are contained there. Captured designs are displayed as "thumbnail" sketches of the Shell which was captured.
Using the operations in the "Edit" menu, designs can be cut or copied from one directory and pasted into another. The "Clear" command deletes the selected design.
By convention, captured designs are given the filename suffix ".xd", although this suffix is not displayed in the Sun WorkShop Visual Capture dialog.
Note - A corresponding ".xpm" file is created with each captured dialog design. This is to enable Sun WorkShop Visual Capture to display the "thumbnail" sketch of the dialog in the window holding area.
This section is a set of step-by-step instructions showing you how to use Sun WorkShop Visual Capture to capture the design of the user-widget configuration utility supplied with Sun WorkShop Visual, visu_config.
| 1. | Select "Sun WorkShop Visual Capture" from the "Tools" menu. |
| 2. | Type visu_config into the Command field of the Command Execution Dialog and press "Ok". |
| The Sun WorkShop Visual Capture tool searches your path (the list of directories set by the PATH environment variable) for the named application, and invokes the first one it finds. Both the visu_config and Capture dialogs are displayed. |
| Note that the Capture dialog is effectively attached to the visu_config program, so when you exit the visu_config application, Sun WorkShop Visual Capture also exits. |
| 3. | Press "Capture" in the Capture dialog. |
| A thumbnail sketch of the active Shell of visu_config appears in the Capture dialog. To capture other dialogs, simply display them in visu_config and then press "Capture" again. Each dialog is added to the window holding area in the Sun WorkShop Visual Capture dialog. |
| 4. | To see the design in Sun WorkShop Visual, drag (using mouse button 2) the thumbnail from the window holding area of the Capture dialog into Sun WorkShop Visual's construction area. |
| As you do this, the Shell and its hierarchy appear in Sun WorkShop Visual. |
Your Sun WorkShop Visual widget hierarchy now contains the widget structure of the initial visu_config dialog along with all associated resources. The dynamic display looks like visu_config. If you captured any sub-dialogs, they can also be dragged into the Sun WorkShop Visual construction area. They are added as separate dialogs.
If your application runs an Application Modal dialog, you will not have access to the Sun WorkShop Visual Capture interface and therefore cannot use the Capture button. Instead, you must press the "hot key". By default, this is set to the F5 function key in the Sun WorkShop Visual resource file. The hot key is translated to the function which effects the capture. The resource file entry is shown below:*xdsTranslations:"<Key>F5: vcrInteractiveCaptureShell()"You can change this to another key by editing the Sun WorkShop Visual resource file (which changes it for every user) or by editing the .Xdefaults file in your home directory (which changes it just for you). We have created a second "hot key" to ensure there are no clashes with your application, this can be accessed by the F12 key.
Note - If you would like more information on translations, you are advised to consult Chapter 4.3.2 in Volume Four of the "X Toolkit Intrinsics Programming Manual" published by O'Reilly and Associates, or any other comparable book.
You can see straight away that Sun WorkShop Visual Capture has captured the appearance of visu_config. In fact, more than that has been captured. Here is a list of what you have:
|
|
The hierarchy of widgets as used in the original application |
|
|
All explicitly set resources. |
|
|
All layout including Form attachments |
|
|
Dimensions |
Sun WorkShop Visual Capture gives you everything you need for the design of a Motif application. Callbacks, links and other dynamic actions associated with the application are not captured.
If you wish to use Sun WorkShop Visual Capture on a design which contains the new Java layout emulation widgets, you must check that the resource xdsCaptureUserWidgets is set to "true". This resource ensures that non-Motif widgets are captured fully. If this resource is not set, the widgets appear as drawing areas in the capture script. For more information on the Java emulation widgets see "New Widgets for Java Classes" on page 328 in Chapter 10 "Designing For Java".
You can capture designs containing third party widgets if you first set the resource xdsCaptureUserWidgets to "true", as described above in "Capturing the Java Emulation Widgets" on page 433. You will be able to view these widgets in Sun WorkShop Visual only if they have already been integrated. For more information on integrating third party widgets see Chapter 23, "User-Defined Widgets", starting on page 631.
Sun WorkShop Visual Capture is supplied as a stand-alone application called visu_capture. Type: visu_capture -x to display basic information about the tool.The following line gives an example of how Sun WorkShop Visual Capture can be used:
visu_capture -f MyCaptureDesign.xd AnApplicationMyCaptureDesign.xd is the name of the file which will contain the captured application. This file will use Sun WorkShop Visual's save file format. AnApplication is the name of the application you wish to capture. Pressing the "hot key" (F5 by default) performs the capture.See "Sun WorkShop Visual Replay and Sun WorkShop Visual Capture" on page 810 for tips and hints about using Sun WorkShop Visual Capture.