CHAPTER 23 |
User-Defined Widgets |
Sun WorkShop Visual is pre-configured with the Motif widget set and can be extended to support widgets from any other source in addition to the default set. Widgets added to Sun WorkShop Visual are called user-defined widgets. They appear in the Sun WorkShop Visual widget palette and users can create them, set their resources and generate code for designs that include them.Sun WorkShop Visual comes with a utility, visu_config, which helps you provide the information Sun WorkShop Visual needs to support user-defined widgets. You specify which widgets you want to use and provide information about any nonstandard resource types defined by the widgets. visu_config generates three C files that serve as a bridge between Sun WorkShop Visual and the user-defined widgets.
After generating the visu_config files, you build a new version of Sun WorkShop Visual from the following components:

|
The Sun WorkShop Visual object file, visu.o |
|
|
Object files or archive libraries containing the added widgets |
|
|
The code file generated by visu_config |
|
|
The config file generated by visu_config |
|
|
Bitmap files for widget icons (optional) |
|
|
Pixmap files for widget icons (optional) |
|
|
Handwritten code files containing any auxiliary functions (optional) |
Icons are recommended but not required. Handwritten code is only required if you want to provide customized popup dialogs, or if you have widgets with special problems described in "Configuration Functions" on page 677.
This chapter describes the use of visu_config. Integrating widgets into Sun WorkShop Visual is a complicated process. visu_config makes this process easier but is still a complex tool to use. However, Sun WorkShop Visual is distributed with pre-configured integration kits for several widget sets. Look in the directory user_widgets in your Sun WorkShop Visual release directory for some of the supported widget integrations. Many more are available on request, so it is highly likely that the set you are interested in already has an integration kit that you can use. Contact your Sun WorkShop Visual supplier for details of the full set available. Each integration kit is supplied with detailed information on how to use it. This is contained in the README file.You probably only need to use visu_config if you are integrating a proprietary widget set or you wish to construct a palette containing more than one widget set in addition to the standard Motif set.
User-defined widgets must build and run against the X11 Release 5 or Release 6 X Toolkit Intrinsics. For each widget class you need the public header file and the object file that implements the widget class. Both of these are provided by your widget supplier. The object file may be in an archive library. You may also need the private header file for the widget class.You need access to the standard UNIX development tools, including the C compiler, linker and make.
visu_config requires standard widget information such as the widget class description. You should therefore have the widget documentation on hand. If your widget has non-standard resource types, or if you want to supply customized popup dialogs, you may also need to refer to the header files or widget source code to get the required information. See "Getting Widget Information" on page 637.
Normally you would generate C or C++ for third party widgets. You can, however, generate UIL. You may need to add extra information in order to tell Sun WorkShop Visual how to do this. This is described in "Generating UIL" on page 683.
If you have user-defined widgets in your design, you can still generate Java code even though there may be no Java equivalent for the widget. Sun WorkShop Visual will substitute any container widget for the Java Panel class and will use the Java Canvas class for any other type of widget. For more information on Java code generation, see Chapter 10 "Designing For Java".
Since Sun WorkShop Visual's dynamic display works by creating actual instances of the widget, any widget you build into Sun WorkShop Visual becomes part of the tool. If the widget doesn't function as expected, Sun WorkShop Visual may fail when the user adds the widget to a design. Any memory leaks in the widget can affect Sun WorkShop Visual and may cause a gradual degradation of performance or a core dump. Even widely-used widgets from standard vendors can have problems. You should therefore test widgets thoroughly before adding them to Sun WorkShop Visual.
To configure Sun WorkShop Visual, you need some knowledge of C and an understanding of common UNIX development tools such as make. You don't have to be an expert on X but you need some knowledge of X and the X Toolkit Intrinsics. visu_config requires you to supply information about the widget, such as the widget class pointer and symbolic constants representing resource types. For suggestions on how to get the required information from the widget documentation or source code, see "Getting Widget Information" on page 637.
Before you start configuring a widget, it is helpful to understand how Sun WorkShop Visual uses widgets in the dynamic display. This section describes some aspects of how Sun WorkShop Visual works internally.
Sun WorkShop Visual builds its dynamic display with real widgets, not simulations. It creates widgets by passing the widget class pointer to XtCreateWidget(). The widget class pointer also gives access to information about the widget's resources and their types so that Sun WorkShop Visual can build a resource panel for the widget.The order in which widgets are created and managed in the dynamic display is different from the typical order of operations in an application. When the user clicks on an icon to add a widget to the hierarchy, Sun WorkShop Visual creates an instance of the widget, realizes it and manages it before any resources are set. When Sun WorkShop Visual reads a hierarchy from a file, however, the hierarchy is created from the bottom up. Each widget is first created, its resources are set and finally it is managed. In either case, create-only resources can't be set ordinarily in the dynamic display since Sun WorkShop Visual creates widgets before setting resources.
Some widgets, such as the Athena Form widget, require resources to be set at creation time or don't behave well when managed without children. In these cases, you can customize Sun WorkShop Visual's procedure for adding the widget to the hierarchy by specifying a Realize function in visu_config. (For more information, see "Realize Function" on page 677.
Note - Neither of these issues affect the generated code. Sun WorkShop Visual generates code that creates the hierarchy from the bottom up and sets all resources at creation time.
When the user selects a widget in the tree, Sun WorkShop Visual highlights that widget's icon in the tree. It also highlights the widget itself in the dynamic display by swapping the widget's foreground and background colors. Highlighting the widget may cause problems if the widget has a create-only foreground resource. In this case, you can disable foreground swapping on the Widget Edit Dialog, as described in "Widget Attributes" on page 643.
Sun WorkShop Visual prevents invalid hierarchies by disabling all palette icons for widgets that are not valid children for the selected widget. Also, when a new widget is added to the hierarchy, Sun WorkShop Visual doesn't automatically select it if it can't have children.For user-defined widgets, Sun WorkShop Visual looks at the widget's superclasses to determine valid hierarchies. You can also specify configuration functions to customize a widget's requirements for valid child and parent widgets. For more information, see "Configuration Functions" on page 677.
Sun WorkShop Visual builds a resource panel for the widget based on resource names and resource types in the widget class record. Resources inherited from a known superclass, such as the Core widget or a Motif parent class, are left off the resource panel and can be set on the resource panel for the superclass.Sun WorkShop Visual automatically assigns resources of standard types to appropriate pages on the resource panel. They can however be explicitly assigned to other pages if required. Most widget resources fall into one of the standard categories; for a summary, see "Resources" on page 648.
When the resource panel is displayed, Sun WorkShop Visual uses XtGetValues() to get the current values of all resources for the widget. All resources except enumerations are converted to text strings and displayed in text fields on the resource panel. The user can set the resource by editing a text string. In some cases, such as fonts, colors and callbacks, the user can supply text indirectly through a popup dialog. For resources that don't already have a popup dialog in Sun WorkShop Visual, you can supply a popup; see "Popups" on page 661.
When the user applies a new resource value, Sun WorkShop Visual converts the text string to a value and applies it to the widget with XtSetValues(). It then immediately calls XtGetValues() to retrieve all resource values for the widget, converts the values back to text and displays them in the resource panel. This procedure shows immediately whether the toolkit accepted the new value and whether the new value caused other resources to change.A function called a resource converter is used to translate a text string to a resource value and back. For standard resource types, the converter functions are built in and you don't have to do anything in visu_config. If your widget has a resource of a non-standard type, visu_config lets you specify information about the converter function. For details, see "Converters" on page 659. If you don't provide this information, the user can type a text string to set the resource in the generated code or resource file but Sun WorkShop Visual can't set it in the dynamic display because it can't convert the text string to a value.
For enumeration resources, Sun WorkShop Visual builds an option menu which, by default, is placed on the "Settings" page of the resource panel. Sun WorkShop Visual can handle Boolean enumeration resources for user-defined widgets. For other enumerations, you must provide a list of valid values in visu_config so that Sun WorkShop Visual can build an option menu. For details, see "Enumerations" on page 653.
Saving designs and parsing save files is straightforward. For resource settings, Sun WorkShop Visual writes the resource name and the text representation of its value to the .xd file. The resource name and value are saved as they appear on the resource panel.When it generates code, Sun WorkShop Visual uses two versions of every resource name. In the generated X resource file, resources are identified by a name such as label. Sun WorkShop Visual gets resource names from the widget class record. In generated code, resources are identified by a defined name such as XtNlabel. Sun WorkShop Visual constructs the defined name by adding an XtN prefix to the resource name. If your widget doesn't follow this naming convention, visu_config lets you specify a function to construct the defined name. For details, see "Configuration Functions" on page 677.
For enumerations, Sun WorkShop Visual also uses two versions of each possible value: a resource file symbol such as center and a code symbol such as XtJustifyCenter. When you configure an enumeration, you must provide both versions of each value.
When Sun WorkShop Visual generates code for any widget class, it generates an #include for that class's public header file. visu_config lets you specify an #include file for each user-defined widget class.
To configure your widget, you may have to supply one or more variable names and symbolic constants from the widget code. This section summarizes the information you may have to provide. Most of the information you need should be available in the documentation for the widget. If not, you can get it from the widget's public and private header file, from the widget source code (if available), or from your widget supplier's technical support service.In the following paragraphs we mention naming conventions that are observed by many widget suppliers. However, naming conventions are not invariable rules. Always check the names in the documentation or source code.
When you add a widget class in visu_config, you need to supply the widget class pointer. The widget class pointer is the name of a pointer variable of type WidgetClass. This pointer gives access to a structure containing information about the widget class, including a list of resources and their types. Sun WorkShop Visual uses this information to build a resource panel for the widget class. By convention, widget class pointers have names of the form <classname>WidgetClass.If you cannot find the widget class pointer in the documentation, look in the public header file for a line such as:
externalref WidgetClass fredWidgetClassorextern WidgetClass fredWidgetClassIn either case, the widget class pointer is fredWidgetClass.
The resource name is a character string used to identify the resource in generated X resource files and on the resource panel. Sun WorkShop Visual gets this name directly from the widget class record and so you don't need to supply it. This string is usually a straightforward name without a prefix, such as label.The defined name is a symbolic constant used to identify the resource name in source code. By convention, the defined name has the form <Prefix>N<name>, where <name> is the resource name. To find defined names, look in the widget documentation, or look in the public header file for #define directives. For example, the following lines from the Athena Form header file identify the defined names XtNtop and XtNbottom:
#define XtNtop "top"#define XtNbottom "bottom"
To configure resources of non-standard types, you need to know the resource type. This is not a type such as unsigned char but a symbolic constant defined as a string by which the widget class knows the resource type. By convention, resource types have the form <Prefix>R<Type>. For non-standard resource types, especially enumerations, <Type> may be the same as the resource name.If the documentation for your widget gives a resource type as foo, look for a line like the following in the public header file:
#define XtRFoo "foo"In this example, you would enter XtRFoo whenever visu_config asks for a resource type. The resource type can also be found in the source code for the widget. The following structure defines a resource whose resource type is XtRFoo. Note that you can also get the resource's defined name, XtNfoo, from this structure.{XtNfoo, XtCFoo, XtRFoo,sizeof(foo), XtOffset( FooWidget, foo),XtRImmediate, (XtPointer) NULL,}
If your widget has non-standard enumeration resources, you need to specify a list of possible values. In some cases you may have to read the source code to get the names you need. For instructions, see "Enumerations" on page 653.
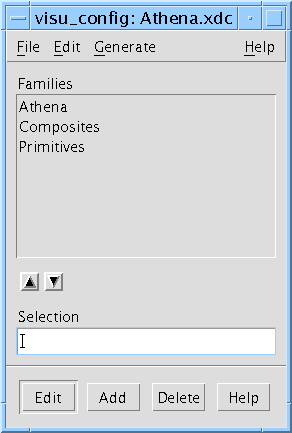
Run visu_config:visu_configThe main dialog shown in Figure 23-1 is displayed.
The visu_config File Menu has options to save and read files containing your configuration data. By convention, these files have the suffix .xdc. Use "Open" to open an existing widget specification file; "Read" to merge another file with the one you are currently editing; "Save" and "Save As..." to save your file and "New" to clear the editing area.The Edit Menu is used to display the Stop List dialog which lets you remove selected Motif widgets from the Sun WorkShop Visual palette. This is discussed in "Motif Widgets Stop List" on page 671.
The Generate Menu contains options to generate the two code files needed to build Sun WorkShop Visual with the added widgets. For information on generating code from visu_config and building Sun WorkShop Visual, see "Generating and Compiling Code" on page 672.
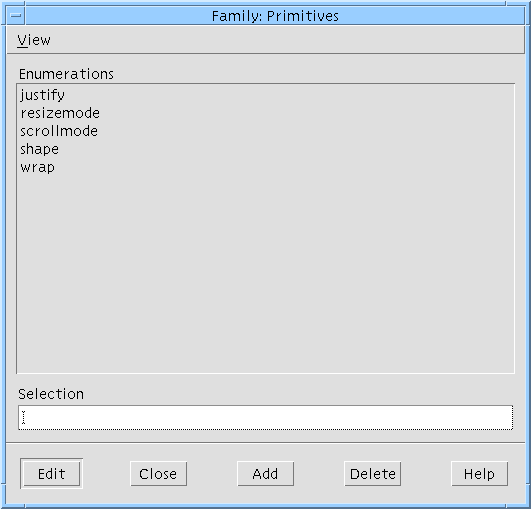
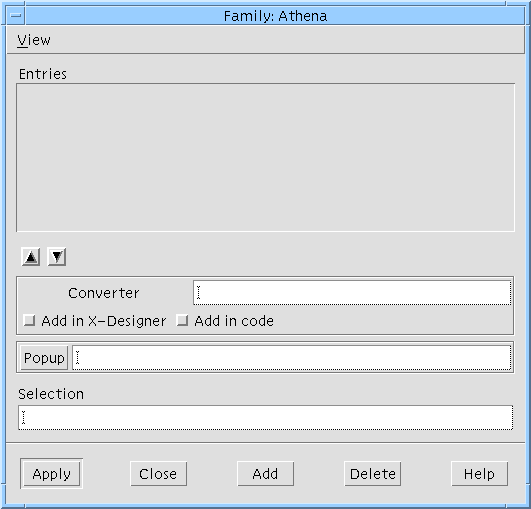
The main dialog displays a list of families. Families are groups of widgets that are displayed together in the widget palette. The list is empty when you start the program. Figure 23-1 shows the dialog after loading the Athena.xdc file supplied with Sun WorkShop Visual. We recommend that you open this file and inspect it as you read.You can organize user-defined widgets into families in any way. Grouping widgets into families has two purposes. First, it keeps the Sun WorkShop Visual widget palette to a reasonable size. At any given time, Sun WorkShop Visual displays the icons for the default Motif widgets plus one user-defined widget family. An option menu lets the user switch from one family to another as with the pages of a resource panel. Second, grouping widgets into families also makes it easy to generate versions of Sun WorkShop Visual with different sets of families. At code generation time, you can select any group of families from your list. This lets you customize Sun WorkShop Visual to support users with different needs and skill levels.
To add a new family to the list, type a name for the family in the "Selection" field, then click on "Add". The family can have any name you choose. It is used to identify the family in visu_config and in the option menu in the Sun WorkShop Visual widget palette.To delete a family, select it in the list and click on "Delete". To reorder the list, select a family and use the arrow buttons to move it up and down. The order of the list determines the order of the items in the option menu in the Sun WorkShop Visual widget palette.
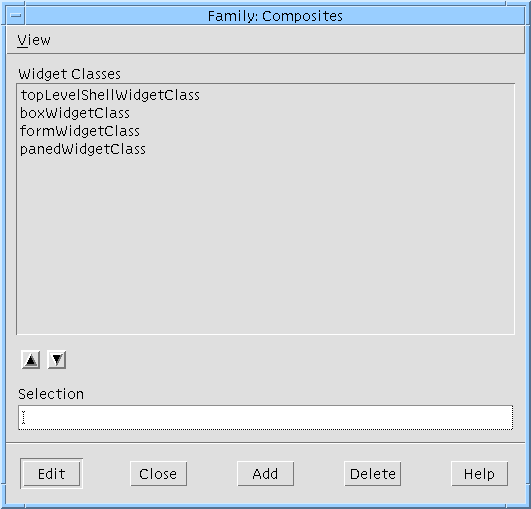
You can include the same widget class in more than one family. For example, in Athena.xdc, the family named "Athena" contains all the Athena widgets and each of the two smaller families, "Composites" and "Primitives", contains a subset of the Athena group. When you generate code from visu_config, you can decide how you want the widget palette to appear. You can either use the large family to display all the Athena widgets on the palette at the same time, or use either of the two smaller families to display a subset of the Athena widgets.You might want to include a frequently-used widget in more than one family so that the user has access to it at all times regardless of what page of the palette is displayed. To do this, however, you have to enter and maintain two separate copies of the widget configuration information and you should test the icon separately on each page of the palette.
When you generate code from visu_config, you can select any group of families from the currently open file but you can't select families from other files. To configure Sun WorkShop Visual with widget families from multiple .xdc files, use the "Read" option to merge the files before generating code.
To add or configure widgets in any family, select the family and then click on "Edit" to display the Family Edit dialog. The Family Edit Dialog lets you:
|
|
Add or delete a widget class in the selected family |
|
|
Edit the specification for a widget class in the selected family |
|
|
Specify instructions for handling non-standard resource types |
|
|
Specify a popup dialog for any resource |
The Family Edit dialog has several pages, which you can select from the View Menu. The name of the currently selected family is displayed in the dialog's title bar.For details about the Family Edit dialog, see the following sections.
To display a list of widget classes in this family, select "Widgets" from the View Menu. Figure 23-2 shows the "Widgets" page for the Athena Composites family.
To add a new widget class to the family, enter the widget class pointer in the "Selection" field and click on "Add". To complete the process, specify attributes for the class as described in the Widget Attributes section below.
To delete a widget class from the family, select it in the list and click on "Delete". To reorder the list, select an item and use the arrow buttons to move it up or down. The order of the widget class list determines the order of widgets in the palette.
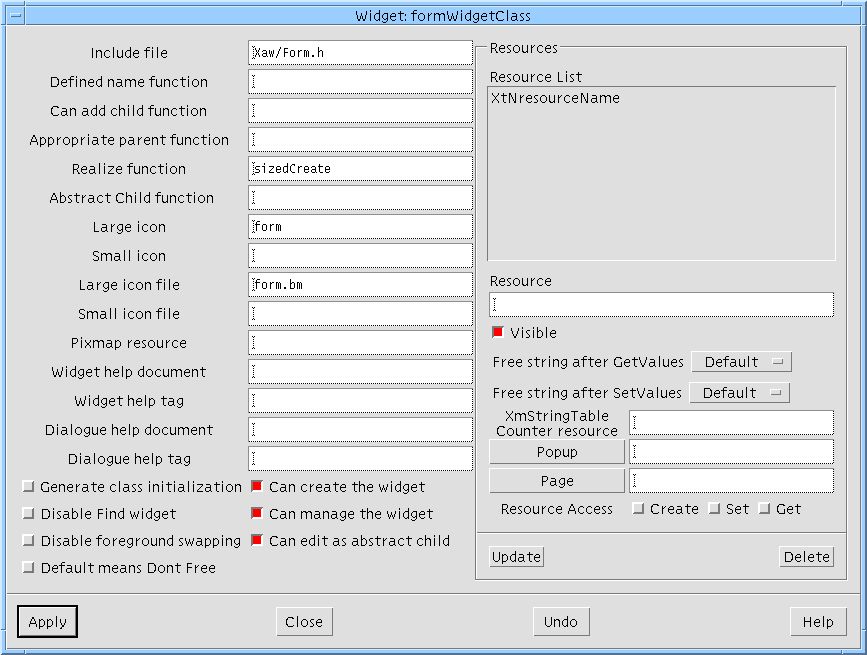
To specify attributes of a widget class, select the widget class in the Family Edit Dialog and click on "Edit". This displays the Widget Edit Dialog, shown in Figure 23-3. The title bar displays the name of the widget class you are editing.This section discusses the attributes set on the left side of the Widget Edit dialog. The right side is used to assign resources to existing or new pages, to specify custom popup dialogs for widget resources, and to override the default resource memory management. For details, see "Resources" on page 648.
When you finish entering widget attributes, click on "Apply" to set the new values. "Undo" reverts to the last applied changes.
FIGURE 23-3 The Widget Edit Dialog with Attributes for Athena Form
In the "Include file" field specify the name of the public header file for the widget class. Enter the file name (usually relative to /usr/include) without quotes or angle brackets. This file is included in two places: in the code file generated by visu_config and in application code generated by Sun WorkShop Visual.
An icon is an X pixmap or bitmap that represents a user-defined widget in the Sun WorkShop Visual widget palette and design hierarchy. For each widget, you can specify both a pixmap and a bitmap. Icon pixmaps are stored in separate files and specified via an entry in the Sun WorkShop Visual resource file.Icon bitmaps are built into Sun WorkShop Visual and are used only if the pixmap resource is not set or the pixmap file cannot be found. If you don't provide an icon in either bitmap or pixmap form, or the specified icon cannot be found, Sun WorkShop Visual displays a button with the widget class name in the widget palette and a crossed square icon in the hierarchy.
To reduce color usage it is recommended that you use the same color palette that Sun WorkShop Visual uses for its icons. Read the following file into the Pixmap editor by selecting "Read palette" from the "Palette" menu:
$VISUROOT/lib/palettes/icons.xpmwhere VISUROOT is the install directory of your Sun WorkShop Visual. See "Read Palette" on page 159 for more information on reading palettes into the Pixmap editor.
Use the "Pixmap resource" field to specify a name for the pixmap resource. After building Sun WorkShop Visual, you can set this resource to specify the pixmap file.For example, if you specify myWidgetPixmap as the pixmap resource for a user-defined widget, you can specify a pixmap in the Sun WorkShop Visual resource file using the following entry:
visu.myWidgetPixmap: /usr/local/newwidget.xpmThis specifies /usr/local/newwidget.xpm as the location of the XPM file. You can use either an absolute or a relative pathname. For details on how to use the pixmap resource, see "Palette Icons" on page 707.
To specify a built-in icon bitmap, you must provide two items of information: the name of the bitmap and the name of the corresponding bitmap file. To specify an icon for the large-screen (workstation) version of Sun WorkShop Visual, use the "Large icon" and "Large icon file" fields. For the small-screen (VGA) version, use the "Small icon" and "Small icon file" fields. You can provide an icon for either version of Sun WorkShop Visual, both, or neither.The large-screen icon must be a 32 by 32 pixel X bitmap and the small-screen icon must be 20 by 20 pixels. You can create icon bitmaps using a tool such as the X bitmap utility. Pixmaps cannot be used for this purpose.
Enter the bitmap name in the "Large icon" or "Small icon" field. The bitmap name is defined in the first line of the bitmap file, as shown below:
#define <bitmap_name>_width 32Enter the icon file name in the "Large icon file" or "Small icon file" field without quotes or angle brackets. Because this file is included when you build Sun WorkShop Visual, your Sun WorkShop Visual makefile must reference (-I) the directory where it is stored. This file does not have to be available to end users.
These attributes let you specify on-line help that is displayed when the user invokes help for the widget on the palette or from the widget's resource panel. For each help item, you specify a document (without any suffix) and a tag if the help for this widget is contained within a larger document. The Sun WorkShop Visual help system searches the path list specified by the visu.helpDir resource to locate the appropriate file. The file name must have a ".html" suffix. The tag refers to an HTML hypertext anchor within the document.
There are four fields for specifying configuration functions: a Defined Name function, a Can Add Child function, an Appropriate Parent function and a Realize function. These functions can be used to fine-tune the way Sun WorkShop Visual handles the widget in the dynamic display. If your widget uses a configuration function, type the name of the function in the corresponding text field.The configuration functions perform the following tasks:
|
|
Defined Name function - Translates resource names to appropriate defined names; required only if the widget doesn't follow standard Motif naming conventions |
|
|
Can Add Child function - Determines whether you can add a widget of another class as a child of this widget |
|
|
Appropriate Parent function - Determines whether a widget of another class is an appropriate parent for this widget |
|
|
Realize function - Adds initialization steps when the widget is created in the dynamic display; required only if the widget cannot be created and managed satisfactorily without children, or requires resources to be set at creation time |
The Can Add Child and Appropriate Parent functions are required only for widgets that have special requirements for valid hierarchies. Often these functions are not needed. If you do not supply them, Sun WorkShop Visual uses the rules for the first known ancestor of the widget class. For example, if a user-defined widget is derived from the Primitive class, Sun WorkShop Visual uses the rules for the Primitive class and does not let the user add children to the widget.For full definitions, synopses and examples of configuration functions, see "Configuration Functions" on page 677. Note that many widgets do not require configuration functions.
At the bottom of the dialog, there are a number of toggle buttons for turning on or off various options relating to the use of the widget. These are detailed in the following sub-sections. Note that the toggles in the "Resources" panel of the Widget Edit dialog are described separately in "Resources" on page 648.
When you create a widget for the first time, it usually does some initialization associated with the specific class of the widget (as opposed to the given widget instance).With some widget sets, leaving this initialization until first create of a given widget may cause a problem; it is often better to explicitly initialize the widget class by hand before creating any of the widgets in the given widget set. This is the case where you have some implicit dependencies between the widgets. For example, you may have a Table widget which can have a Table Label widget as a child. However, some code in the Table may assume that the Label class has been initialized. In such a case, you would need to pre-initialize the Label class before you use a Table, even if you are not going to attach a Label into the Table.
If this toggle is set, Sun WorkShop Visual will generate the following line into your main module:
XtInitializeWidgetClass(widget_class)before calling any creation code.This toggle is set by default, since it does not cause a problem to pre-initialize the class, but, for some widgets at least, it can cause problems if you do not.
Unset this toggle if you wish to prevent the user from using the Fast Find facility on this widget. You may wish to turn off this option if Fast Find does not interact well with your widget in the dynamic display.
Normally, Sun WorkShop Visual highlights the currently selected widget in the dynamic display. To disable highlighting for this widget class, turn on the "Disable Foreground Swapping" toggle. Do this only if the widget class has a foreground resource that cannot be set after widget creation time. This is required because Sun WorkShop Visual's highlighting procedure can cause problems with such widgets. In all other cases, leave the toggle off.
This allows you to set the default way in which Sun WorkShop Visual handles the memory management of XmString and String (char *) widget resources. This topic is discussed in more detail, including the use of this toggle, in "Resource Memory Management" on page 668.
When the "Can Create the Widget" toggle is on, users can build the widget directly into hierarchies. Leave this toggle on if you want the widget's icon to appear in the palette.Turn the toggle off to make the widget class an invisible superclass like the Core widget. If you turn the toggle off, the widget doesn't appear in the widget palette and users can't create instances of it directly. Sun WorkShop Visual creates a separate resource panel for the class. The resource panel can be accessed by any derived widget classes.
Not all widgets are GUI components. For example, the various Data Object classes in the INT ChartObject widget set are for representing components of a graph (Circles, Rectangles, Axes, etc.) in an MVC (Model View Controller) model. In this case, you would not render these objects directly but let the graph parent handle it all internally.Sun WorkShop Visual does have some internal rules over what it can and cannot manage: it knows that managing anything that is an ObjectClass or derivative (as opposed to a WidgetClass) is forbidden by the toolkit - it will corrupt the ObjectClass if you do so. However, some widget sets have Data Objects derived via WidgetClass, even though these are not meant to be managed. Sun WorkShop Visual cannot be aware of these exceptions; its rules about what to manage would be wrong, both internally and in the generated code. Use this toggle, therefore, in those rare occasions when you need to stop Sun WorkShop Visual managing the given component.
This refers to visu's ability to display, configure and generate code for the abstract children of composite widgets. The Motif ScrolledWindow widget is an example of a composite widget - the scrollbars are the abstract children. Turn this toggle off if your widget is a composite and you do not wish users to have any access to the abstract children. More information on accessing the abstract children of third party composite widgets in Sun WorkShop Visual is given in "Accessing Abstract Children" on page 674.
By default, when Sun WorkShop Visual creates the resource dialog for a widget, it gets the name and type of the resource directly from the widget code and builds a resource panel. It assigns each resource to a page of the resource panel (based on the resource type) and assigns a popup dialog for certain types. For example, resources of type XtRPixel are put on the Display page of the resource panel, with a button to pop up the Sun WorkShop Visual color editor.You do not have to do anything to configure a resource unless you want to change this default behavior or unless the resource is not of a type listed in the table of standard types shown below.
Resources of standard types are assigned to pages of the resource panel as shown in the following table:
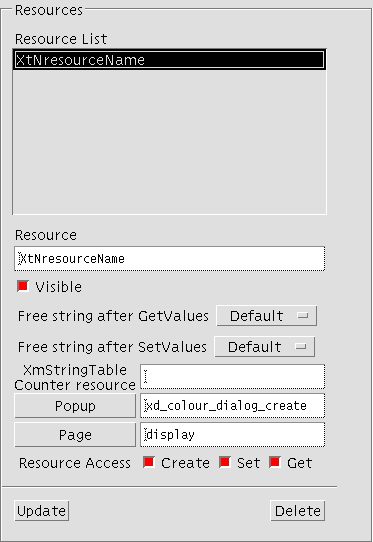
The right side of the Widget Edit dialog lets you do the following things for individual widget resources:
|
|
Inhibit the resource from appearing on the resource panel |
|
|
Assign the resource to a selected page of the resource panel |
|
|
Specify a popup dialog for setting the resource |
|
|
Control the memory management of the resource. This is described in "Resource Memory Management" on page 668. |
|
|
Control the "CSG" (Create/Set/Get) accessibility of a widget's resource. |
To customize the attributes of a resource, type the resource name in the Resource field. This should be the defined name, such as XtNcursorName.To remove the resource from the resource panel, turn off the "Visible" toggle.
To specify a different page of the resource panel, click on the "Page" button to display the current list of pages. The list is preset with the default Sun WorkShop Visual pages. To add a page, type the name of the new page in the "Page name" field and then click on "Update". To assign the current resource to a page, select the page in the list and then click on "Apply".
visu_config automatically invokes the Sun WorkShop Visual predefined popups for some types of resources, as shown in the following table. You don't have to specify a popup explicitly to use these popups for resources of these types:
You can specify a popup dialog for any resource. You can select one of the predefined popups or create your own. For more information, see "Popups" on page 661.
Some resources come in pairs. When an array of XmStrings is passed to a Motif list, you also have to say how many strings are in the array. The following code, for example, causes your application to core dump:XmString *xmstrings = ... ;XtVaSetValues(list, XmNitems, xmstrings, NULL) ;The array resource has no notion of an end-of-array marker, such as a null terminated list. You have to explicitly give the count, as in the following example:int n = ... ;XmString *xmstrings = ... ;XtVaSetValues(list, XmNitems, xmstrings, XmNitemCount, n, NULL) ;The "XmStringTable Counter resource" text field is for pairing together the array and array counter resources, so that X-Designer can use them together internally and also generate the right code with both resources used at once.This is for both XmString array resources and for char ** array resources which each need a paired counter resource.
There are three toggles controlling the accessibility of a widget's resources. The toggles are labelled "Create", "Set" and "Get". These relate directly to "CSG" in the Motif documentation. Unsetting the "Set" toggle will make the resource read only in Sun WorkShop Visual and in the code generated by Sun WorkShop Visual. Unsetting the "Get" toggle means that you will not, in your code, be able to fetch the value of the resource. Unsetting "Create" means that you will have to create the resource yourself.Documentation for third party widgets is often unreliable for "CSG" (Create Set Get), therefore the feature can be disabled by setting the resource:
visu.xwResourceAccessControl: false
By default, resources of types not in the table of Sun WorkShop Visual standard resource types are placed on the "Miscellaneous" page of the resource panel. The user can set them by typing strings into text fields. The strings are generated into the code exactly as the user types them and resource settings take effect when the generated code is compiled.This default behavior has some disadvantages. Sun WorkShop Visual doesn't recognize the resource type, so it cannot set the resource in the dynamic display. Enumeration values must be spelled and capitalized correctly (including any prefix) or the generated code will not compile.
visu_config offers several ways to refine the way Sun WorkShop Visual handles nonstandard resource types:
|
|
You can specify an alias for a resource whose type behaves like one of the standard types. For example, if your resource is of a non-standard type that works the same as XmRInt, you can instruct Sun WorkShop Visual to treat it as XmRInt |
|
|
You can configure Sun WorkShop Visual to handle enumerations of types other than XtRBoolean. After you do this, the enumeration resource is placed on the "Settings" page of the resource panel from where the user can set it with an option menu. Misspellings are prevented and the resource is active in the dynamic display |
|
|
You can specify converters for resources of other types. The converter lets Sun WorkShop Visual set the resource in the dynamic display |
|
|
You can specify a popup dialog for any resource. For resources with popup dialogs, Sun WorkShop Visual creates a PushButton on the resource panel to invoke the dialog |
The following sections give detailed instructions for these procedures.
If your widget uses a resource type that is not in the standard list but has the same semantics as a standard type, you can tell visu_config that your type is an alias for the standard type. For example, if you define a type XtRDegrees as an integer from 0 to 359, you can set up an alias to specify that XtRDegrees is equivalent to XmRShort. The user can then set any XtRDegrees resource on the "Margins" page of the resource panel and see the results immediately in the dynamic display.
The new resource type must have the same semantics as the standard type. Specifically, the process by which a text string is converted to a resource value and back again must be the same for both types.
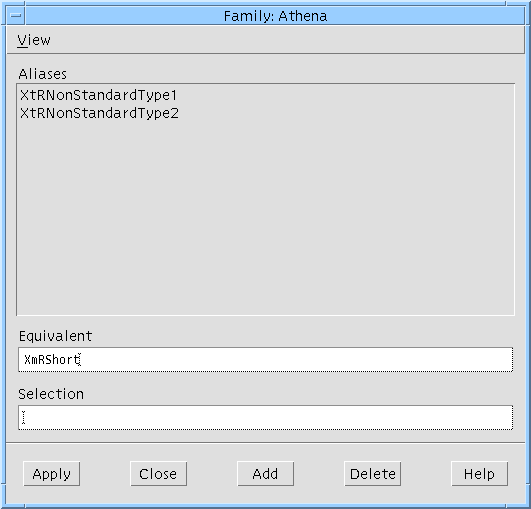
On the Family Edit Dialog, pull down the View Menu and select "Aliases" to display the dialog shown in Figure 23-4.
To specify an alias, enter the non-standard resource type in the "Selection" field and the name of the corresponding standard in the "Equivalent" field. Click on "Apply" to register the alias.
Enumeration resources are resources with a fixed set of possible values. You can determine if a widget has enumeration resources by inspecting the documentation. If the documentation lists all possible values for a resource, it is an enumeration. Note that enumerations of type XtRBoolean are handled automatically and don't require the configuration procedure described in this section.By default, Sun WorkShop Visual treats all other enumerations as it treats any unknown resource type. It places them on the "Miscellaneous" page of the resource panel and the user can set them by typing a new value in a text field. The setting is passed to the generated code but has no effect in the dynamic display.
Use the instructions in this section to give Sun WorkShop Visual the information it needs to build an option menu for the resource on the "Settings" page of the resource panel and set the resource in the dynamic display.
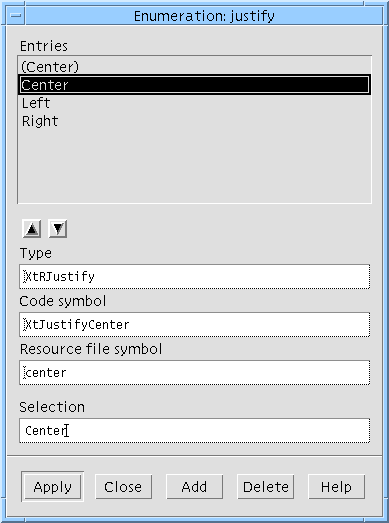
Select "Enumerations" from the View Menu in the Family Edit Dialog to display the "Enumerations" page. Figure 23-5 shows the list of enumerations for the Athena Primitives family.
FIGURE 23-5 The "Enumerations" Page of the Family Edit Dialog
To add a new enumeration, enter a name in the "Selection" field and click on "Add". This name is only for your convenience in visu_config. You can use the resource name from the widget documentation or any other string that helps you identify the resource. Since all enumerations for the family are kept together in one list, it may be useful to include the widget name as well as the resource name.
To complete the process, you need to provide the following information about the enumeration resource:
|
|
The resource type |
|
|
A list of possible values |
|
|
The default value |
|
|
The code symbol for each value |
|
|
The resource file symbol for each value |
Suggestions for getting the code symbol and resource file symbol are given at the end of this section. To configure an enumeration, select it in the list of enumerations and click on "Edit". This displays the Enumerations Entry Dialog, shown in Figure 23-6. The title bar displays the name of the enumeration.
Specify the resource type and configure each value as described below. When you finish, click on "Apply" to set the new values.
Enter the resource type in the "Type" field.
To get a list of values for an enumeration, look in the widget documentation or the public header file. Make an entry in the "Entries" list for each possible value. Entries in the list are only used in the option menu on the resource panel and can be any names you want. Sun WorkShop Visual uses names that are meaningful to the user, such as Horizontal rather than XmHORIZONTAL.For each value, type the name in the "Selection" field and click on "Add". Note that omitting a value isn't fatal but the user won't be able to set that value.
For each value, you must specify the code symbol and the resource file symbol in the Enumerations Entry dialog. The code symbol is a symbolic constant that denotes the value in generated code. The resource file symbol is a string that denotes the value in resource files.To find the code symbol, look at the list of values in the widget documentation or the widget source code. Type the code symbol in the "Code symbol" field.
Type the resource file symbol for the value in the "Resource file symbol" field. Often, the resource file symbol is the code symbol, converted to lower case and stripped of any prefix, but this is not an invariable rule. For example, the resource file symbol for XtJustifyCenter is center.
The resource file symbol is not always listed in widget documentation. If it isn't, you may be able to get it from an example resource file or from the widget supplier's technical support service. If you have source code for the resource converter, you can get the resource file symbol from the code, as described in "Getting the Resource File Symbol" on page 657.
The first entry in the list of values on the "Enumerations" page is reserved for the default value. This entry is used to indicate a resource that is not set explicitly. The option menu should also contain an entry for the same value set explicitly. By convention, the default value is distinguished by putting its name in parentheses, as shown in the following list:(Center)CenterLeftRightSpecify the same code and resource symbols as for the corresponding explicit value.Note that Sun WorkShop Visual builds one option menu for the each enumeration type. If your widget has multiple resources of the same enumeration type, they share an option menu. If the resources have different default values, a suggested approach is to enter a generic default value, (Default), on the option menu.
Enter code and resource symbols for any one of the possible default values. This does not result in errors in the generated code or when widgets are initially created in the dynamic display. The dynamic display may be incorrect if the user explicitly sets this resource and then explicitly requests the default value. However, any such problem disappears after the widget is reset.
The order of entries in the list on the "Enumerations" page controls the order in which they appear in the option menu on the resource panel. Entries can be listed in any order as long as the default value is listed first. To move an entry to a different position, select it in the list and use the arrow buttons to move it up or down.
This section explains how to get the resource file symbol you need to enter on the Enumerations Entry Dialog from the resource converter code for the widget. The resource converter is a function used to convert a string read from the resource file to the corresponding value. A simple converter may contain fragments like this:if (StringsAreEqual (in_str, "vertical"))i = XmVERTICAL;else if (StringsAreEqual (in_str, "horizontal"))i = XmHORIZONTAL;In this example, the string "horizontal" is converted to the value XmHORIZONTAL and "vertical" is converted to XmVERTICAL. horizontal and vertical are the resource file symbols; XmHORIZONTAL and XmVERTICAL are the code symbols.You may find it done more indirectly, as shown in the following code:
if (!haveQuarks) {XtQEhorizontal = XrmStringToQuark(XtEhorizontal);XtQEvertical = XrmStringToQuark(XtEvertical);haveQuarks = 1;}XmuCopyISOLatin1Lowered(lowerName, (char *)fromVal->addr);q = XrmStringToQuark(lowerName);if (q == XtQEhorizontal) {orient = XtorientHorizontal;done(&orient, XtOrientation);return;}if (q == XtQEvertical) {orient = XtorientVertical;done(&orient, XtOrientation);return;}In this code, the resource file symbols are represented by the symbolic constants XtEhorizontal and XtEvertical. To get the resource file symbols, horizontal and vertical, examine the related header files for lines such as:#define XtEhorizontal "horizontal"#define XtEvertical "vertical"The code file symbols, XtorientHorizontal and XtorientVertical, are the end result of the conversion. Note that in this example there is an intermediate step: the strings are converted to quarks and the quarks are used for the comparison. The mechanics of the conversion procedure do not affect visu_config.
If your user-defined widget has resources of non-standard types other than enumerations, Sun WorkShop Visual places them on the "Miscellaneous" page of the resource panel by default. The resources can be allocated to other pages from the Widget Edit Dialog. The user can set these resources by typing a string into a text field. By default, the string is generated into the code or resource file but Sun WorkShop Visual doesn't set it in the dynamic display. To make the resource work in the dynamic display, you can configure Sun WorkShop Visual with a converter function for this resource. The converter function is a function that converts a text string to a resource value.To configure the converter, select "Converters" from the View Menu. This displays the page shown in Figure 23-7. The "Entries" list contains a list of resource types in this family for which converters have been specified.
Enter the resource type in the "Selection" field and click on "Add".
Many widgets add their own converters internally when the class is initialized. If this is the case, all you have to do is add the resource type to the list on the "Converters" page. Adding the resource type to the list informs Sun WorkShop Visual that the converter is available; otherwise Sun WorkShop Visual doesn't attempt to set the resource in the dynamic display.To find out whether the widget class adds its own converter, look in the widget documentation or look for a call to XtSetTypeConverter() in the code for the widget's Class Initialize method. If the converter is not added internally or if you are in doubt, instruct Sun WorkShop Visual to add the converter explicitly, as described below.
If the widget doesn't add converters internally, you can instruct Sun WorkShop Visual to add them explicitly. To do this, specify the name of the converter function in the "Converter" box. The converter must be a function of type XtTypeConverter. Toggles are provided to add the converter explicitly either in Sun WorkShop Visual (for use in the dynamic display), in the generated code, or in both. In general, if you have to add the converter explicitly, both toggles should be on.
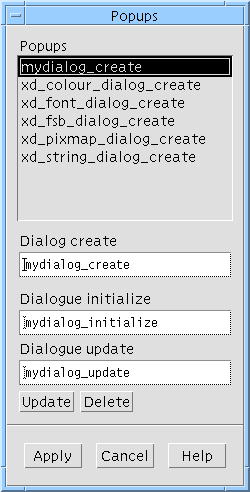
The "Popup" button lets you specify a popup dialog to be used for setting all resources of this type. For details, see the Popups section below.
Resource popups are dialogs used to set a resource, such as Sun WorkShop Visual's color and font selectors. For resources that have popups, Sun WorkShop Visual creates a button on the resource panel to invoke the popup, in addition to the usual text field. Figure 23-8 shows popup buttons on the Sun WorkShop Visual Core resource panel.
You can specify a popup dialog for any individual resource. To do this, use the right side of the Widget Edit Dialog, shown in Figure 23-9. Select the name of the resource in the list. If you haven't yet added the resource to the list, enter the defined name of the resource, such as XtNresourceName, in the "Resource" field and click on "Update".
This dialog uses resource names and not resource types. Therefore, you can specify different popups for different resources of the same type. For example, if you specify a popup dialog for a specific resource of type XmRInt, that popup is not displayed for other resources of that type.After you enter the resource name, click on the "Popup" button to display the Popups Dialog. Select a popup using the instructions in "The Popups Dialog" on page 663 section below.
If you specify a converter for a resource type, you can specify a popup dialog for that type. To do this, click on "Popups" on the "Converters" page of the Family Edit dialog. This displays the Popups Dialog. Select a popup using the instructions in the following section.
The Popups Dialog is shown in Figure 23-10.
The Popups Dialog displays the current list of popups. The list is preset with the built-in Sun WorkShop Visual popup creation functions:
To apply an existing popup to the currently selected individual resource or converter type, select the popup creations function in the list and click on "Apply". Note that all popup dialogs return the resource value in the form of a string such as "red" or "<big_font>". Therefore they work for resources that are declared as strings but are used to specify fonts, colors, or filenames.
You can create your own popup dialog, add it to the list and apply it to any resource or converter type. Three functions are required for each popup dialog: a create function, an initialize function and an update function. Enter the name of each function in the appropriate text field and then click on "Update" to add the popup to the list.
The popup functions are invoked at different points in Sun WorkShop Visual, as shown below:
Add callbacks on widgets in your popup dialog to furnish hooks for additional functionality such as setting the new value, editing the value, accessing help and popping down the dialog. Your dialog should have at least the following standard callbacks:
TABLE 23-5 Callback
Functionality
Apply callback
Sets new resource value in source text widget.
Close callback
Pops down the dialog by unmanaging it.
The Text or TextField widget on the resource panel (called the source text widget) is used to pass information from the dialog to the resource panel. When the user sets a value on the popup dialog, the value should be converted to text and set into the source text widget. The user can then click on "Apply" on the resource panel to set the value in the dynamic display, just as if the text had been typed by hand.
You can build your dialog in Sun WorkShop Visual or code it by hand. The example at the end of this section shows a popup dialog that was built in Sun WorkShop Visual.
The create function is called the first time the user clicks on the resource button to pop up the dialog. This function should create the widget hierarchy for the dialog.void popup_create ( Widget parent )The parent parameter is the Application Shell widget for Sun WorkShop Visual, to be used as the parent widget for the dialog. This parameter is required to call functions such as XmCreateDialogShell(). You can build popup dialogs in Sun WorkShop Visual and use Sun WorkShop Visual's generated creation procedure as the create function, or write a create function that calls it. In this case, pass parent on to the function generated by Sun WorkShop Visual.Note that the initialize function is called immediately after the create function and so you don't have to manage the widgets if you do it in the initialize function.
The initialize function is called every time the user clicks on the resource button to pop up the dialog. The first time the dialog is invoked, the initialize function is called after the create function. The function should make the dialog visible by managing it and initialize any fields in it. The initialize function is passed the source text widget, the currently selected widget and the resource name.void popup_initialize( Widget source_text, Widget current, char *resource_name)The source_text parameter is the source text widget on the resource panel. This widget can be used to obtain the resource value currently displayed on the resource panel. Since the source text widget is used to pass back the new value from the dialog, the initialize function should also save the source text widget in a static variable so that it is available later.current represents the currently selected widget. The initialize function should check whether the currently selected widget has the expected resource because the user can invoke the popup dialog from the resource panel after selecting a widget of a different type. Note that current is NULL if the user has deleted all widgets in the hierarchy.
resource_name contains the resource name (a string such as "label"), not the defined name. This parameter is especially useful when you use the same popup to set more than one resource.
The update function is called for every popup dialog each time the selection changes in the widget hierarchy.void popup_update( Widget current )current represents the newly selected widget. The update function should make the "Apply" button insensitive if the newly selected widget is of a different class, or if current is NULL. If you use the same dialog to set multiple resources, the safest approach is to make the "Apply" button insensitive in all cases. The user then has to click on the resource button again in order to use the popup. This extra step invokes the initialize function and ensures that the intended resource is set.
This example shows a simple resource popup consisting of a slider that is used to select an integer value. When the user clicks on "Apply" in the popup, the slider's value is converted to a text string and placed into the text widget in the resource panel.The dialog itself was built in Sun WorkShop Visual. The Shell for the dialog was designated a Data Structure resulting in the structure shown below. Named widgets in the dialog are easy to access through the structure pointer foo_dialog. For example, foo_dialog->scale accesses the Scale widget.
typedef struct foo_dialog_s {Widget foo_dialog;Widget form;Widget scale;Widget apply;Widget close;} foo_dialog_t, *foo_dialog_p;static foo_dialog_p foo_dialog = (foo_dialog_p) NULL;The following function is generated to create the Shell and all its children. The body of the generated function is omitted.foo_dialog_p create_foo_dialog (Widget parent){/* Sun WorkShop Visual generated code to create the dialog omitted here.*/}In the module prelude a static variable is created to hold the source text widget. The initialize function provides the source text widget.static Widget source_text;The dialog has an "Apply" button and a "Close" button, each with an Activate callback. The "Apply" button invokes the callback function shown below. This callback function gets the current value of the Scale, converts it to a text string and sets it into the source text widget. Note that this doesn't set the resource; the user must still click on "Apply" on the resource panel.static voidfoo_do_apply (Widget w, XtPointer client_data, XtPointer call_data ){int i;char buf[52];XmScaleGetValue ( foo_dialog->scale, &i );sprintf ( buf, "%d", i );XmTextSetString ( source_text, buf );}The dialog also has a "Close" button. The Activate callback function on this button simply unmanages the child of the dialog's Shell widget.static voidfoo_do_close (Widget w, XtPointer client_data, XtPointer call_data ){XtUnmanageChild ( foo_dialog->form );}The create function calls the Sun WorkShop Visual generated creation function and saves the widget structure.foo_create( Widget parent ){foo_dialog = create_foo_dialog( parent );}The initialize function extracts the text from the source text field, converts it to an integer and sets the Scale to reflect the current value. It saves the source text field and so the new value set using the Scale can be applied to the source text field. It enables or disables the "Apply" button depending on the class of the current widget and makes the dialog visible.foo_initialize( Widget text, Widget current){char *source_value;int i;source_text = text;source_value = XmTextGetString( source_text );i = atoi( source_value );XtFree( source_value );XmScaleSetValue( foo_dialog->scale, i );XtSetSensitive( foo_dialog->apply,
current && XtIsSubclass (current, fooWidgetClass ) );XtManageChild( foo_dialog->form );}The update function enables or disables the "Apply" button, depending on the class of the current widget.foo_update( Widget current ){XtSetSensitive( foo_dialog->apply,
current && XtIsSubclass( current, fooWidgetClass ) );}
Sun WorkShop Visual assumes a default memory management model for XmString and String (char *) type resources. For XmString type resources this model assumes that the widget will copy the XmString both on SetValues and on GetValues (i.e. the application can free the XmString after a GetValues or SetValues).For String resources it is assumed that the widget copies the String on SetValues but not on GetValues (i.e. the application only frees a String after a SetValues). If you have a resource that does not conform to this model (typically an XmString resource that is not copied by the widget on GetValues), then you can override Sun WorkShop Visual's default behavior using the two Option Menus in the resource section. Where an XmString is not copied on GetValues, you should set the GetValues Option Menu to "Don't Free" in the Widget Edit dialog. Similarly, if you have a String resource that is copied by the widget on GetValues (for example XmNmnemonicCharset in a Label Widget) then you should set the GetValues Option Menu to "Free".
If you wish Sun WorkShop Visual always to default to not freeing the resources, set the "Default means Don't Free" toggle.
It is important to make sure that Sun WorkShop Visual does not free memory that it should not free as this will cause Sun WorkShop Visual to crash. It is less important if Sun WorkShop Visual is not freeing memory that it should free, as this will simply accumulate as a memory leak.
For Sun WorkShop Visual to handle XmStringTable resources correctly, you must also specify the integer type resource which is used as a count for the number of entries in the table. Add a resource specification for the XmStringTable.
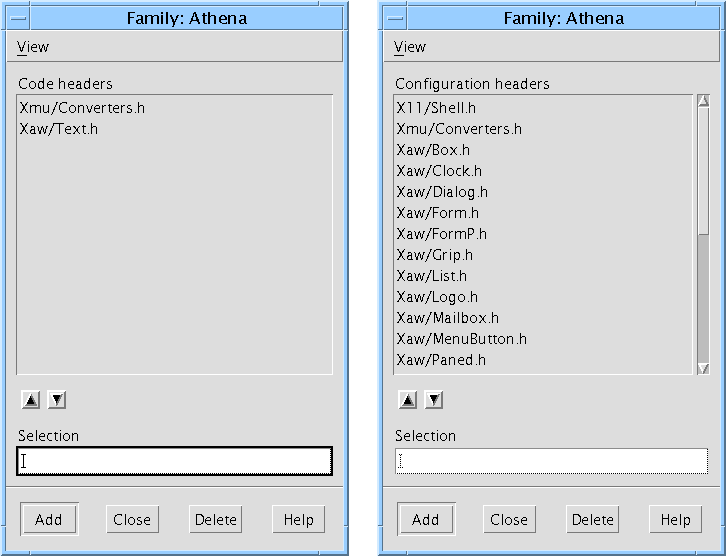
visu_config generates two code modules, the Config file and the Code file. visu_config lets you specify a list of headers for each of these files. To specify these headers, use the Family Edit Dialog. Select "Code Integration Headers" from the View Menu to display the "Code headers" page and select "Config Integration Headers" to display the "Configuration headers" page. Both pages are shown in Figure 23-11.
FIGURE 23-11 The Code and Config Headers Pages of the Family Edit Dialog
There is a separate list of headers for each file. To add a header, type the filename, without quotes or angle brackets and click on "Add". To delete a header, select it and click on "Delete". To reorder a list, select any entry and use the arrow buttons to move it up or down.The Code file defines the widget class records for user-defined widget classes. visu_config automatically generates a #include for the widget class header file which it takes from the Widget Edit dialog. Often no additional Code headers are needed.
The Config file contains a list of user-defined widgets, enumerations, and aliases. Widget headers for user-defined classes aren't automatically generated to this file. If you configure visu_config with non-standard enumerations or resource types, include the header file in which they are defined.
The easiest way to find out what headers are needed is to generate and compile the code. If the compiler returns an undefined reference, find out which header contains the necessary definition and add it to the header list for that file. Then regenerate the code and try again.
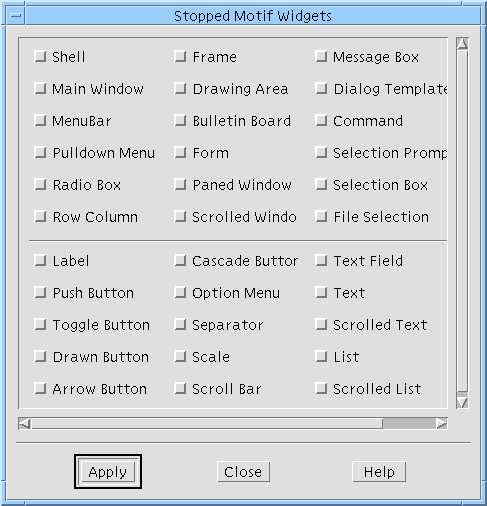
You can use visu_config to stop selected Motif widgets from appearing in Sun WorkShop Visual. Stopped widgets do not appear in the widget palette. They work correctly if read in from an existing design file but cannot be selected in the hierarchy or created interactively. For example, you can use this feature to prevent users from using the PanedWindow widget if it isn't in your company's style guide.To stop a widget, pull down the Edit Menu in the main visu_config dialog and select "Stop list" to display the dialog shown in Figure 23-12:
To remove a Motif widget from the widget palette, set the appropriate toggle and click on "Apply".Widgets can also be stopped by setting the visu.stopList resource, as described in "Configuration" on page 886. Note that widgets stopped using the resource can be reactivated easily using the resource file, while widgets stopped in visu_config can only be reactivated by rebuilding Sun WorkShop Visual.
User-defined widgets cannot be stopped using this dialog. You can select which user-defined families to make available in Sun WorkShop Visual via the visu_config Generate dialog, as discussed in the following section.
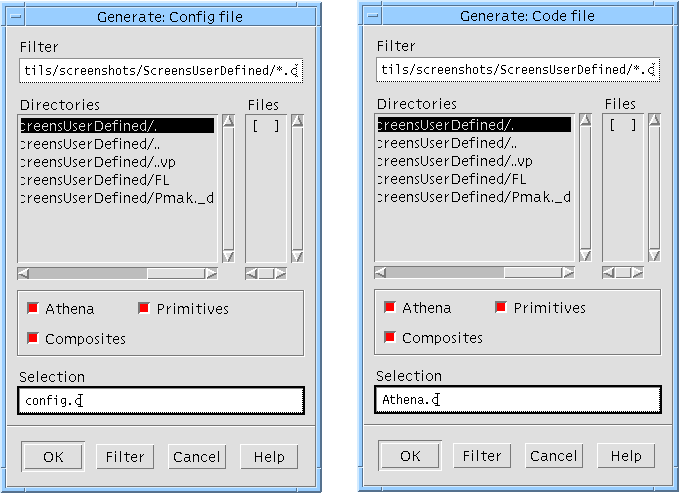
The Generate Menu has two options, Config and Code which are used to generate the two configuration files. The pages displayed for each option are similar, as shown in Figure 23-13. Use the toggle buttons to select the families you want to include. Generate both files, using the same set of families for each.
The example makefile in $VISUROOT/user_widgets/Athena1 compiles a Config file named config.c, a Code file named Athena.c and a file containing configuration functions, Athenaextras.c. These files and all the Athena icon bitmaps, are located in $VISUROOT/user_widgets/Athena. You can use this makefile to compile the Athena example. The result is an executable file called visu.bin.When you configure with other widgets, use the example makefile as a starting point. Make sure that the makefile references all directories containing icon bitmap files and required header files.
If the compilation fails, inspect the generated code to find the problem. The cause may be a missing header. You can supply additional headers on the Code and Config Headers pages of the Family Edit dialog. The compiler also catches any misspellings in any of the visu_config dialogs. Fix the problem, regenerate the Code and Config files, then recompile.
Note that the linker detects any misspelled function names. If the misspelling occurred in visu_config, correct the problem, regenerate the Code and Config files, then recompile.
The executable file is invoked with the correct environment by setting the environment variable USER_WIDGETS to the name of the user widgets directory (in this example "Athena") and invoking the standard visu command in $VISUROOT/bin. This causes the local bitmaps or color_icons directories to be added to $XBMLANGPATH and the local app-defaults directory to replace $VISUROOT/lib/locale/<LANG>/app-defaults in $XFILESEARCHPATH.A site-wide default can be set up by making a symbolic link called "local" in $VISUROOT/user_widgets to the user widgets directory of choice. In this case all users will get that version of Sun WorkShop Visual by default unless they explicitly override it with a setting of USER_WIDGETS. When USER_WIDGETS contains a value that is not recognized, or the visu.bin in that user widgets directory has not been built, the site default, if configured, or original "vanilla" Sun WorkShop Visual is invoked instead.
Sun WorkShop Visual allows you full access to the abstract children of third party composite widgets. The Motif ScrolledWindow is an example of a composite widget - the scrollbars are the abstract children.The following resource allows control over the accessibility of abstract children:
visu.abstractObjects: trueThe resource defaults to "true", which allows access to the children of third party widgets. Setting this to "false" will result in no children being displayed.You can configure the accessibility of composite widget in visu_config, see "Can edit as abstract child" on page 648.
Children of third party widgets can be fully configured through their resource panels. They cannot, however, be cut from your designs.
In the generated code, Sun WorkShop Visual calls XtNameToWidget in order to gain access to a component of a third party widget. Such components will normally have unique names. If, however, the widget names are not unique, using XtNameToWidget will not work correctly. In such a case, you will have to edit the generated code and use another means of accessing the widget.
Sun WorkShop Visual does not generate cross-platform code (MFC or Java) for the children of third party widgets. A place holder, such as a Canvas, is added in place of the root widget.
This section describes a recommended testing procedure for the Sun WorkShop Visual interface for a user-defined widget. Use visu_config as suggested to fix any problems. Note that these tests are designed to detect problems with the way in which the widget was configured into Sun WorkShop Visual; they do not test the widget itself.
Note - This test is not appropriate if you turned off the "Can create widgets" toggle in the widget attributes panel.
Run Sun WorkShop Visual and verify that the icon for the user-defined widget is correct. If you use the small screen Sun WorkShop Visual, invoke Sun WorkShop Visual with the name small_visu and verify that the icon is correct in this case, too.Create a hierarchy that contains an instance of your widget. If Sun WorkShop Visual fails when the widget is added, you may need a Realize function. For details, see "Configuration Functions" on page 677. If the failure is accompanied by an X error message about zero height/width windows, try using sizedCreate() (found in Athenaextras.c) as the Realize function for the widget.
If this does not work, try setting the "Disable foreground swapping" toggle in visu_config.
If you have not disabled foreground swapping, create a hierarchy containing the user-defined widget. Select the Shell in the hierarchy and then select the user-defined widget. Verify that the widget in the dynamic display highlights correctly when selected. If this causes a problem, set the "Disable foreground swapping" toggle in visu_config.
Create a dialog containing an instance of the user-defined widget with every resource set. Generate C from Sun WorkShop Visual and compile it. If it fails to compile, you may get a message like this:XtNfoo undefinedIf you get such a message, first verify that the generated code includes the right public header for the widget class. If it doesn't, correct the header in the "Include file" field of visu_config's Widget Edit dialog.If the header is being generated correctly but you still have compilation problems, you may need a Defined Name function. Look in the public header for a line such as:
#define <something> "foo"If <something> is not XtNfoo, you need a Defined Name function. For details, see "Configuration Functions" on page 677.
If you have specified that resources for the user-defined widget should appear on specific pages, verify that they do and that all the required pages are present.
Display the "Miscellaneous" page of the resource panel for the user-defined widget. Verify that you can type valid resource values into the text widgets and that they are correctly applied to the widget. If you get a message indicating that there is no resource converter, you need to use the "Add in Sun WorkShop Visual" setting in visu_config.
Display the "Settings" page of the resource panel for the user-defined widget. Make sure the option menus all have the default value in parentheses at the top of their menus.Display the "Miscellaneous" page if there is one. Enumeration resources appear on this page if they weren't configured in visu_config. If enumeration resources do appear on this page, go back and add them using visu_config.
Set each value for the enumeration in turn, including the default. Verify that each value works as expected in the dynamic display and that the generated code compiles correctly.
If you specified custom popup dialogs for any resources, display the page of the resource panel on which each resource appears. Verify that the resource panel displays a button for each resource with a popup dialog. Click on the button. Verify that the dialog appears and is correctly initialized with the current value for that resource.Set the resource in your dialog. Verify that the text widget on the resource panel updates correctly. Apply the setting from the resource panel and verify the result in the dynamic display.
If your dialog has a "Close" button, verify that it works as expected and that the dialog reappears when you click on the button on the resource panel.
Finally, verify that the generated code is correct. To check the generated code, set each resource in turn, generate a C code file and an X resource file and inspect them to see that you get what you expect.Code inspection for all the Motif widgets forms part of the Sun WorkShop Visual release process. Therefore if you have a user-defined widget that is derived from a Motif widget, you can concentrate on testing resources that are specific to the user-defined widget. This is also true if you have a user-defined widget that is derived from another user-defined widget that you have already tested.
visu_config lets you provide configuration functions to customize Sun WorkShop Visual's handling of user-defined widgets. This section provides definitions and examples of the configuration functions.To add a configuration function, specify the name of the function on visu_config's Widget Edit dialog for the widget class, then regenerate the Code and Config files from visu_config. Edit your makefile to compile and link the file containing the code for your configuration functions.
For examples of the configuration functions that were used to integrate the Athena widgets into Sun WorkShop Visual, see:
$VISUROOT/user_widgets/Athenaextras.c2.
By default, Sun WorkShop Visual creates widgets in the dynamic display by calling XtCreateWidget(). You can supply a Realize function to substitute for this. A Realize function is only needed for widgets that cause problems when created in Sun WorkShop Visual.
The Realize function has the following form. Note that it takes the same parameters and returns the same result as XtCreateWidget().Widget realize( char *name, WidgetClass class, Widget parent, ArgList args, Cardinal arg_count )The ArgList passed to a Realize function is always empty.
Some composite widgets, such as the Athena Form widget, cannot be realized without children unless their dimensions are explicitly set at creation time. Otherwise the widget is created at zero size, causing an X error. To solve this problem in the dynamic display, you can supply a Realize function like the one shown below, found in Athenaextras.c. This function initializes the widget's width and height resources to non-zero values, then calls XtCreateWidget() and returns the result.WidgetsizedCreate( char *name, WidgetClass class, Widget parent, ArgList args, Cardinal arg_count ){Arg al[2];int ac=0;XtSetArg(al[ac], XtNheight, 20); ac++;XtSetArg(al[ac], XtNwidth, 20); ac++;return XtCreateWidget ( name, class, parent, al, ac);}The Realize function is only used when Sun WorkShop Visual creates the widget in the dynamic display. It has no effect in the generated code.
In order to generate both code files and X resource files, Sun WorkShop Visual uses both the resource name, such as label, and the corresponding defined name, such as XtNlabel. Sun WorkShop Visual gets the name directly from the widget class record. By default, Sun WorkShop Visual derives the symbolic constant from the name by adding an XtN prefix.If your widget doesn't follow this convention, you can configure Sun WorkShop Visual with a Defined Name function. The Defined Name function is a custom procedure that converts a resource name to its corresponding symbolic constant. To find out whether a widget needs a Defined Name function, look in the public header for the widget class. The header file contains lines like the following that define the symbolic constant and its value:
#define XtNlabel "label"#define XtNfont "font"#define XtNinternalWidth "internalWidth"You need a Defined Name function if any of the defined names don't follow the naming convention. For example, many widget toolkits, including Motif, use a different prefix:#define XmNbuttons "buttons"#define XmNbuttonSet "buttonSet"#define XmNbuttonType "buttonType"
The Defined Name function has the following form:char *defined_name ( char *name )The Defined Name function is passed a character string containing a resource name and should return a character string containing the corresponding defined name. Your Defined Name function can refer to Sun WorkShop Visual's internal Defined Name function, def_defined_name(). This function simply adds the default XtN prefix to the resource name.
Note - The function names defined_name and def_defined_name are already used by Sun WorkShop Visual so you should make sure that you do not use these names.
The defined name for the Athena Clock widget resource hands is not XtNhands but XtNhand. Therefore, the Clock widget needs the following Defined Name function:char *clock_defined_name( char *name ){/** XtNhand is defined as hands, so can't just put
* XtN on the front*/if ( strcmp ( name, "hands" ) == 0 )return "XtNhand";return def_defined_name ( name );}All Clock resources except hands follow the naming convention and so def_defined_name() is used to convert them.
You can supply Appropriate Parent and Can Add Child functions to define the rules for valid parent-child relationships involving user-defined widgets. These rules control Sun WorkShop Visual features such as graying-out of palette icons, automatic selection of newly created widgets and dragging icons in the construction area.Often these functions aren't needed. If you don't supply them, Sun WorkShop Visual uses the rules for the first known ancestor of the widget class. For example, if a user-defined widget is derived from the Primitive class, Sun WorkShop Visual uses the rules for the Primitive class and doesn't let the user add children to the widget.
The Appropriate Parent and Can Add Child functions are combined with rules for other widgets. For example, Sun WorkShop Visual already has a rule that MenuBar widgets can only have CascadeButtons as children, so you don't need an Appropriate Parent function to prevent the user from making your widget a child of a MenuBar. You only need to supply functions if your widget class has additional rules.
If you configure Sun WorkShop Visual with a non-Motif composite widget, the widget class should have a Can Add Child function to prevent it from having Motif children. Motif widgets assume that their parents are Motif widgets and Sun WorkShop Visual may core dump if a Motif widget is made a child of a non-Motif widget.
The Appropriate Parent function is called when the user tries to add a widget of the user-defined class to the hierarchy, or tries to drag or copy the user-defined widget to another parent. This function determines whether the user-defined widget can be added as a child of the selected widget.The Appropriate Parent function has the following form:
Booleanis_appropriate_parent ( parent, childclass )Widget parent;WidgetClass childclass;The first parameter is an instance of a widget in the hierarchy that is a proposed parent widget; the second is a pointer to your new widget class. The function should return TRUE if it is valid to add a child of your new class to the proposed parent widget and FALSE otherwise.Because the Appropriate Parent function is passed the instance of the proposed parent widget, you can make rules based on either the class or the state of the parent widget. For example, you can check the parent widget's dimensions, ancestor widgets, or other children before letting the user add a new child of your user-defined class.
By default, Sun WorkShop Visual lets Motif Manager widgets, such as the Form and Row Column, have children of any type. Appropriate Parent functions let you restrict the widget to being a child of only certain classes. For example, if your widget can only be a child of a DrawingArea, supply an Appropriate Parent function that returns TRUE if the proposed parent widget is a DrawingArea and FALSE if not. The code for this case is very simple:Booleandrawing_area_parent ( w, class )Widget w;WidgetClass class;{if ( XtClass ( w ) == xmDrawingAreaWidgetClass )return True;return False;}
The Can Add Child function has the following form:Booleancan_add_child ( parent, childclass)XWidget_p parent;WidgetClass childclass;{...}This function is used for two purposes. Sun WorkShop Visual calls the Can Add Child function to determine whether a widget of a specific class is a valid child of the user-defined widget and calls the Can Add Child function to determine whether it should automatically select a newly created instance of the user-defined widget.The first parameter is a pointer to an existing instance of the user-defined widget class. The parent widget instance is passed as an XWidget_s structure, an internal Sun WorkShop Visual data type that represents a widget instance. One field of this structure is a pointer to the widget instance. For documentation on the XWidget_s structure, see $VISUROOT/user_widgets/hdrs/xwidget.h.
The second parameter may be a pointer to a proposed child widget class, or may be NULL. If the second parameter is non-NULL, Sun WorkShop Visual is inquiring about a proposed child class. The function should return TRUE if the child can be added and FALSE if not. Note that you have a pointer to the parent instance but not to the child class because the child widget hasn't been instantiated. Your function may make rules based on the current state of the instance of the user-defined widget. For example, you can write a function that lets your widget accept only a limited number of children. If the second parameter is NULL, the user has just created a widget of this class.
If the Can Add Child function returns TRUE, Sun WorkShop Visual selects the newly created widget in the hierarchy; otherwise, the parent widget remains selected. In this case, the Can Add Child function should usually return TRUE if the widget can have children of any type and FALSE otherwise.
The following example shows a Can Add Child function.Boolean paned_can_add_child ( XWidget_p xw, WidgetClass class ) {/* For newly created instance of this widget class, make the newly created widget the currently selected widget in the hierarchy. */if (class == NULL)return TRUE;/* Allow all children except Drawing Area and ScrollBar. */if ( class == xmDrawingAreaWidgetClass ||class == xmScrollBarWidgetClass )return False;elsereturn True;}
You can generate UIL for third party widgets. Any information Sun WorkShop Visual needs to do this is provided as part of the widget integration set3. If, however, you are integrating a new set of third party widgets, you will have to give Sun WorkShop Visual the extra information it needs in resources, as described below.
In order to generate UIL code for third party widgets, you have to provide Sun WorkShop Visual with enough information about the header files, creation procedures and template files. Most commonly used widget sets have already had this done for them - contact your Sun WorkShop Visual supplier for more details.The following information is required when you wish to use a lesser known widget set:
| 1. | UIL Header Files |
| 2. | UIL Creation Procedures |
If the third party widget has a UIL header file associated with it, this is specified as follows:visu.xw_<third_party_widget_class>.uilHeaderFile: foo.uilFor example, the XRT 3D widget is defined in this way:visu*xw_XtXrt3d.uilHeaderFile: Xrt3d.uil
Note - UIL header files are supplied as part of the XRT widget set.
Many widget sets that do not come supplied with UIL header files, have had the header file created for them in order to enable UIL code generation from Sun WorkShop Visual. These can be found in:$VISUROOT/user_widgets/USER_WIDGET_NAME/code_templates/UILwhere VISUROOT is the install directory of your Sun WorkShop Visual.The make templates generated for third party widgets have UILFLAGS set to include this code_templates directory automatically, as well as any normal widget-vendor locations. So for XRT the Makefile would contain the line:
UILFLAGS=-I${XRTHOME}/include/Xm ...In this way, any third party widget with a UIL header will build.
Non-motif widgets need to pre-declare creation procedures in any UIL header file, but not all suppliers do this. For this reason, there are two resources to control the required creator procedure that Sun WorkShop Visual must generate to get UIL to create the third party widget. Here are the three cases you must consider to work out which resource to use:
| 1. | The supplied header file already has a procedure declaration. |
| 2. | The widget creator name has not been put in. |
| 3. | No pre-defined creator exists. |
| 4. | Special processing is required in order to create the widget. |
Note - We cannot simply generate a declaration whatever the circumstance because UIL does not like multiple declarations of the same procedure. Hence we have two resources, so that Sun WorkShop Visual can tell when to generate the declaration and when not to.
These cases are described separately below.
A Procedure Declaration Exists
If there is already a procedure declaration in the header file, specify the name that Sun WorkShop Visual must generate like this:visu*xw_<third_party_widget_class>.uilBuiltinProcedureName: the_procedure_nameFor example, XRT have the UIL creator XtCreateXrt3d already declared in Xrt3d.uil, so you would only need to tell Sun WorkShop Visual the name to generate:visu*xw_XtXrt3d.uilBuiltinProcedureName: XtCreateXrt3dCode like the following then appears in our generated UIL:object some_third_party_object: user_definedthe_object_creator_procedure_nameSo for the sample XRT, Sun WorkShop Visual would generate something like:include_file "Xrt3d.uil";object my_xrt_3d_variable: user_defined XtCreateXrt3d;
No Widget Creator Name Added
If the widget author has not put a widget creator name in, we need Sun WorkShop Visual to generate not only the call to some creator, but also a declaration.visu*xw_<third_party_widget_class>.uilProcedureName: the_procedure_nameSun WorkShop Visual would then generate the following:include_file "AnySpecifiedUilHeader.uil";/* THIS NEXT LINE IS BAD IF AnySpecifiedUilHeader.uil already has this */procedure the_procedure_name();...object my_third_party_variable: user_definedthe_procedure_name;
There is No Pre-Defined Creator
Having no pre-defined creator means, for example, that there is no XmCreatePushButton to replace the lower level generic XtCreateWidget() call.Sun WorkShop Visual will in this case generate:
| 1. | A creator with the name constructed from the widget class into the UIL file. |
| 2. | A declaration for this into the UIL file. |
| 3. | An actual function with the same name in the C for UIL file to wrap this up. |
The form of the generated constructor is XdUilCreate<widget_class_name>This will automatically happen if Sun WorkShop Visual comes across some third party widget where no resources for UIL have been set.
For example, if we had a widget class FredWidgetClass, the UIL file would contain the following:
procedure XdUilCreateFredWidgetClass();...object fred_variable : user_defined XdUilCreateFredWidgetClassAnd the C for UIL would contain:...Widget XdUilCreateFredWidgetClass(parent, name, argv, argc)Widget parent ;String name ;Arg *argv ;Cardinal argc ;{return XtCreateWidget(name, fredWidgetClass, parent, argv,argc) ;}
Special Processing Needed for Widget Creation
If special processing is required to create one of the third party widgets but no UIL creator procedure has been declared, a procedure is needed in standard form with the contents pre-configured.This is done through the following resource:
visu*xw_<widget_class>.uilProcedureTemplate: some_file_nameThen, some_file_name is simply written out, as is, between the curly brackets of any UIL procedure Sun WorkShop Visual has to generate into the C for UIL.For example, if the fred widget had to have its size set before being created, we would have to:
| 1. | Create a file called fred.uil_template |
| 2. | Put this into $USER_WIDGETS/code_templates/UIL |
| 3. | Set the resource: |
XDesigner*xw_fred.uilProcedureTemplate:
$USER_WIDGETS/code_templates/UIL/fred.uil_template
Note - The value of this resource can take shell variables that are then expanded automatically.
The next step is to write this template file fred.uil_template as follows:/* START OF UIL TEMPLATE FILE */Arg *av ;Cardinal ac ;Widget w ;/* Copy down any passed arguments */av = (Arg *) XtMalloc((unsigned) (argc + 2) * sizeof(Arg)) ;for (ac = 0 ; ac < argc ; ac++) {av[ac].name = argv[ac].name ;av[ac].value = argv[ac].value ;}/* Add the necessary width, height */XtSetArg(av[ac], XmNwidth, 100) ; ac++ ;XtSetArg(av[ac], XmNheight, 100) ; ac++ ;w = XtCreateWidget(name, fredWidgetClass, parent, av,ac) ;/* tidy up */XtFree((char *) av) ;return w ;/* END OF UIL TEMPLATE FILE */X-Designer here will go through its normal algorithms for deciding the actual name of the UIL procedure required, then will put the above between the curly brackets of this UIL procedure in the C for UIL file.
2 $VISUROOT is the path to the Sun WorkShop Visual installation root directory.
3 Contact your Sun WorkShop Visual supplier for details of available widget integration sets.