


Sun WorkShop Visual can generate toolkit independent code which it calls Smart Code. Smart Code can be used in a single generated application or as a means of communicating between a client and a server. When used for client server applications, Sun WorkShop Visual generates a thin client using Java, Motif (C or C++) or Microsoft Windows MFC code and a separate server application. Sun WorkShop Visual generates code which uses HTTP as the transport protocol. The generated application can be used within your organizations Intranet or it can connect to any location on the Internet.
To create a client server or "Web-aware" application from your design, Sun WorkShop Visual uses Groups as the basic data structure for communication and Smart Code as the means to access the Group. Groups also provide extra usefulness within your design. They are described in Chapter 15, "Groups", starting on page 479.
|

|
This chapter describes the "Get/Set" flavor of Smart Code. |
By default, traditional Motif, MFC or Java callbacks are generated. Ask for Smart Code by selecting the "Smart Code" toggle in the Callbacks dialog.
Smart Code gives your callback toolkit-independence, not language independence. You still choose the language you wish to generate. Smart Code is simply a layer of code which "wraps up" the widgets in a Group using the specified language.
An option menu, shown in Figure 16-1, allows you to choose one of three styles of Smart Code:
| |
1. |
Get/Set. This provides you with a suite of "getter" and "setter" functions for a group of widgets. |
| |
2. |
Thin Client. This provides not only the getters and setters, it also triggers Sun WorkShop Visual to generate a separate client application containing the user interface and a server application containing the Smart Code callback(s). In addition, the code to handle the communication protocol between the two is generated. |
| |
3. |
Internet. This option is very similar to the "Thin Client" option above except that no server application is generated. Use this option for generating applications which will connect to an existing server or which will fetch Web pages. |
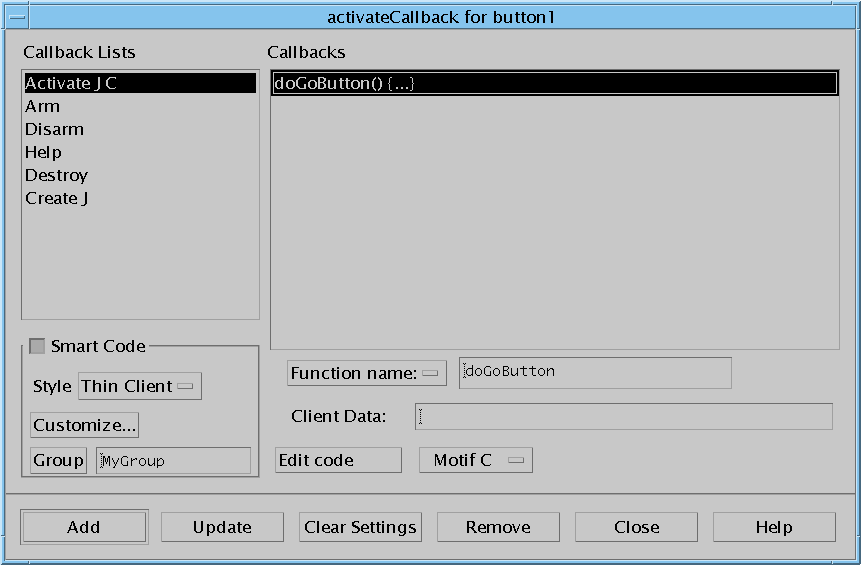
FIGURE 16-1 Smart Code in the Callbacks Dialog
A Smart Code callback requires a Group. This Group gives the callback a handle onto a set of objects which can then be programmed in a toolkit-independent way. To specify a Group do one of the following:
| |
1. |
Type the name of a Group into the "Group" text field. |
| |
2. |
Press the "Group" button to display the Group Editor, select a Group and press "Apply". |
The "Style" option menu lets you choose the type of Smart Code you require and, therefore, the structure of the application you are creating. The code generated for each style is different. The sub-sections below describe each style individually.
Choosing "Get/Set" from the Smart Code style menu in the Callbacks dialog tells Sun WorkShop Visual to generate toolkit independent wrappers for the components in the specified Group. These are also called "getter" and "setter" functions; they allow you to get and set the value of the Group's components without writing any toolkit-specific code.
For example, suppose you are using C and you have a widget named "text1" and a toggle named "toggle1" in a Group named "MyGroup", as shown in Figure 16-2.
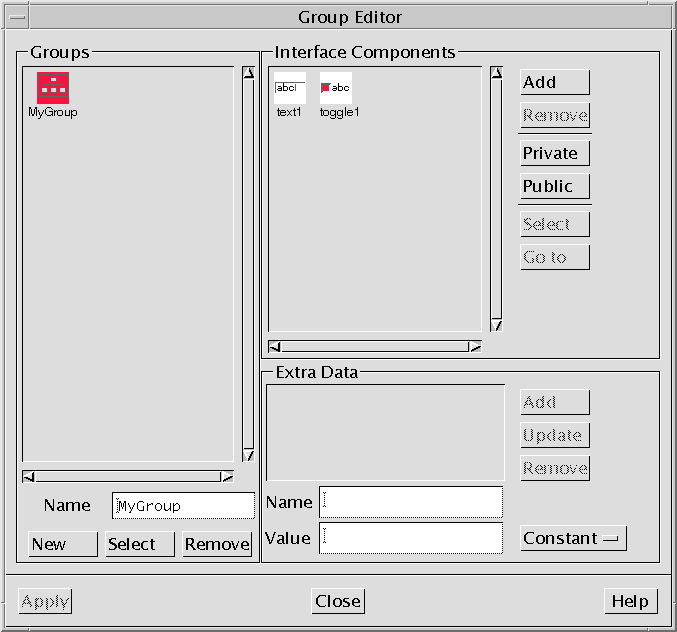
FIGURE 16-2 Group "MyGroup" in Group Editor
In order to access this Group in a callback, you would define a Smart Code callback, choosing "Get/Set" as the Smart Code style and specifying "MyGroup" as the Group to be used in the callback. This is shown in Figure 16-3.
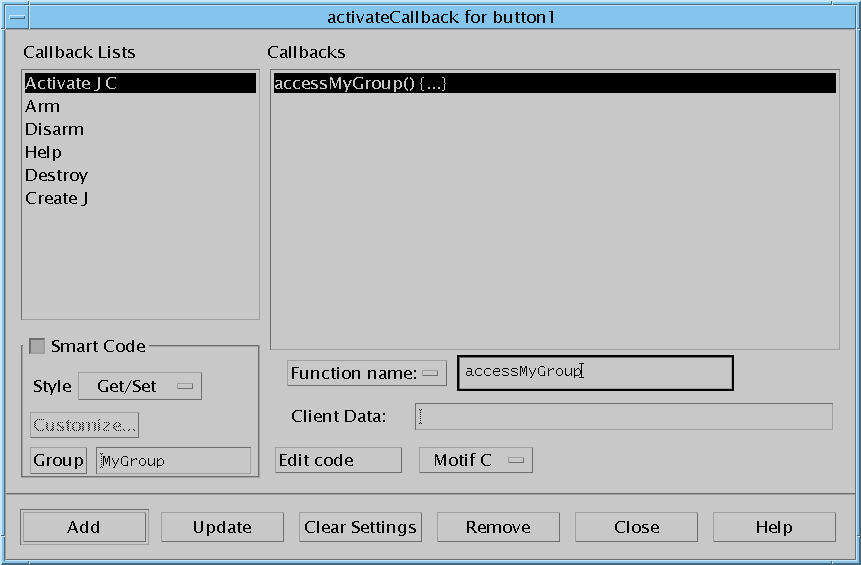
FIGURE 16-3 Callback using "MyGroup"
Smart Code Callback in C
The code generated for the callback shown in Figure 16-3 would look like this:
#include <stdio.h>
#include "sc_groups_c.h"
void
accessMyGroup_user ( d, group, client_data)
sc_data_t * d;
MyGroup_t* group;
void* client_data;
{
}
The data structure sc_data_t which is passed into Smart Code callbacks contains information mainly relevant to the communication between a client and a server. You can find the definition of this structure in the header file sc_groups_<language>.h. This file is generated by Sun WorkShop Visual into the directory specified in the Generate dialog. See "Generated Code" on page 529 for more information on the code generated for Smart Code and Chapter 17, "Thin Client Smart Code", starting on page 503 for more information on creating a client and server from your design.
To get the value of "text1", you would simply need to add the following line to this callback:
char * val = SC_GET(Value, group->text1);
This next piece of code checks the state of the toggle and enters text into "text1" if the toggle is set:
if (SC_GET(State, group->toggle1)
SC_SET(Value, group->text1, "The toggle is set");
This example assumes that you are using C. Because the C syntax is more cumbersome, macros are also provided to maintain ease of programming. The macros are called SC_SET and SC_GET. They take two parameters. The first is the type of query (the thing you are getting - Value, State etc.) and the second is the widget you wish to access (via its Group).
Smart Code Callback in C++
The Smart Code callback generated for the example shown in Figure 16-3 is different from the example above when C++ is the chosen language in the Generate dialog. In this case, Sun WorkShop Visual generates a subclass of the internal pre-defined Smart Code class sc_data_c using the name of the callback as the new class name. The class sc_data_c corresponds to the C data structure sc_data_t described above. The routine called from the main application when this callback is triggered, is the doit() method of the new class. The following listing of accessMyGroup_user.cpp from the directory callouts_cpp illustrates this. accessMyGroup was the name of the callback method entered in the Callbacks dialog.
The getGroup() method is a convenience routine in the parent sc_data_c class:
#include <stdio.h>
#include "sc_groups_cpp.h"
class accessMyGroup_user: public sc_data_c
{
void doit() {
MyGroup_c * g = (MyGroup_c *)getGroup();

}
};
sc_data_c *
getNew_accessMyGroup()
{
return (sc_data_c*) new accessMyGroup_user;
}
In C++, you do not need to use the macros described for C code. The following line of code fetches the contents of "text1":
char * str = g->text1->getValue();
The following line checks the state of the toggle and sets the contents of "text1" if the toggle is set:
if (g->toggle1->getState())
g->text1->setValue("The toggle is set");
Smart Code Callback in Java
When Java is the selected language in the Generate dialog, your Smart Code callback shown in Figure 16-3 is generated as a subclass of the SCData Smart Code class. This is similar to the C++ model described above. You add your own code to the doit() method of the class. The super class, SCData, includes a convenience function to get a handle to the Group. The SCData class is defined in the file SCData.java in the utils_java subdirectory beneath your generate directory.
For the example shown in Figure 16-3, the following code would appear in a file named accessMyGroup_user.java found in the callouts_java subdirectory:
package callouts_java;
import groups_java.* ;
import utils_java.* ;
public class accessMyGroup_user extends SCData
{
public void doit() {
group0_c g = (group0_c)getGroup();

}
public static accessMyGroup_user getNew()
{
return new accessMyGroup_user();
}
}
In Java, you do not need to use the macros described for C code. Instead, you would do something similar to the C++ model. The following line of code would fetch the contents of "text1":
String str = g.text1.getValue();
The following line checks the state of the toggle and sets the contents of "text1" if the toggle is set:
if (g.toggle1.getState())
g.text1.setValue("The toggle is set");
Priming Dialogs Using the Create Callback
The example above shows a callback defined for "Activate". This means that your "Get/Set" code is not called until the button is pressed. If you need to "prime" the widgets in a dialog when the dialog is first displayed, define a Smart Code callback for the "Create" callback of the shell. This callback will occur just once when the dialog is created..
The create callback of a widget is called after all the widget's children have been created. The widgets in a Group must be created before a Smart Code callback can access them. Using the shell's create callback to prime a dialog means that you can be sure all the widgets have been created before the create callback is triggered since the shell is the last widget to be created. If you do not wish to set up a callback on the shell, add an arbitrary container to your design (if you do not already have one) which contains all the widgets in your Group. Since child widgets are always created before their parent, in this way you can be sure that the widgets in the Group you have specified for the Smart Code callback have been created before the Smart Code callback is triggered.
Using Getters and Setters
The toolkit-independent wrappers are very simple to use. A full list of the functions provided for each widget type is given in Appendix C, "Getters and Setters", starting on page 859.
HTML Files
In order to help you locate callbacks and familiarize yourself with the files generated when Smart Code is requested, Sun WorkShop Visual also generates a set of HTML files. The main one is:
|
|
index.html |
and is found in the top-level directory (i.e. the directory named in the Generate dialog).
This file, when opened in a web browser (or anything else which can read HTML) lists the files generated along with a brief description of each one. Sun WorkShop Visual creates a symbolic link in your generate directory to a directory in the Sun WorkShop Visual install directory in order to access HTML files which describe the unchanging features of Smart Code.
This simple tutorial takes you through the main features of Groups and Get/Set Smart Code. The tutorial sets up a Group and uses Smart Code to get and set the values of the group members.
When completed, the application looks as shown in Figure 16-4.
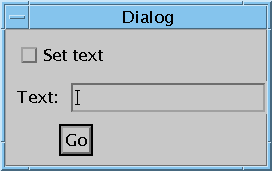
FIGURE 16-4 Final Application
| |
1. |
Start Sun WorkShop Visual. |
| |
2. |
Create an Application Shell and a Form. Inside the Form, put a button, a label, a textfield and a toggle. |
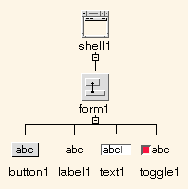
FIGURE 16-5 Initial Tutorial Hierarchy
| |
3. |
Select the label, text and toggle widgets and press the Group Editor button on the toolbar. |
| |
|
This is the same as selecting "Add to a New Group" from the Widget menu. |
The Group Editor now appears, as shown in Figure 16-6.
| |
4. |
Change the name of your new group to "MyGroup" by typing this into the text field labelled "Name" and pressing the Return key. |
| |
|
You do not have to change the name of the group, but doing so may be simpler, especially if you intend to have a large number of groups. |
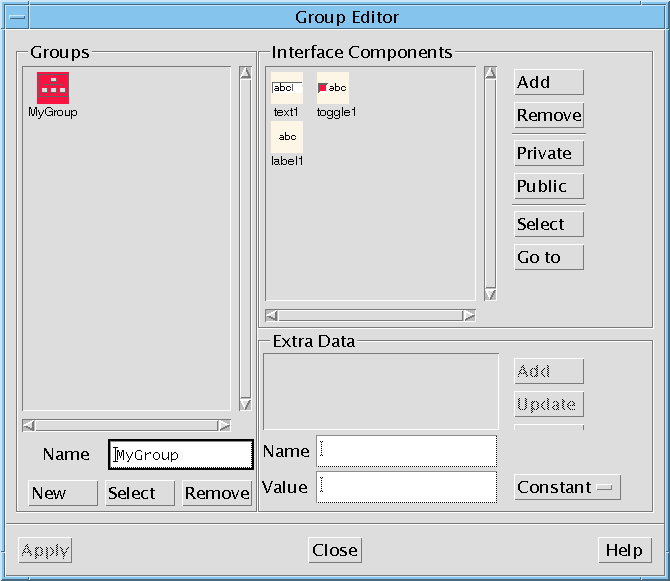
FIGURE 16-6 Group Editor for New Group
| |
5. |
Close the Group Editor. |
| |
|
The "Apply" button only becomes enabled when you are selecting a group to add to a callback, as will be seen later. |
| |
6. |
Change the layout of the widgets in the Form and the labels of the button, label and toggle so that they are as shown in Figure 16-7. |
| |
|
This is a purely cosmetic alteration. The label of the button is "Go", the label is set to "Text:" and the toggle is "Set text". |
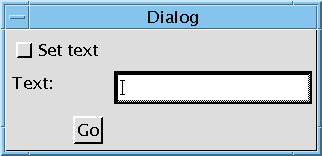
FIGURE 16-7 Widgets Laid Out and Labels Set
| |
7. |
Display the Callbacks dialog for the button. |
| |
|
You can do this by either pressing the Callbacks button on the toolbar or choosing "Callbacks" from the Widget menu. |
| |
8. |
Make sure that "Activate" is selected from the callback lists. |
| |
|
We are choosing "Activate" so that the callback is called when the button is pressed. |
Note - In the Callback Lists section, the Activate callback is shown with a `J' after it indicating that it is applicable to Java code. These annotations are described in "Callbacks" on page 178.
| |
9. |
Set the "Smart Code" toggle. |
| |
10. |
Select "Get/Set" from the Smart Code option menu. |
| |
11. |
Press the button labelled "Group". |
| |
|
This displays the Group Editor. Note that the "Apply" button is now enabled. |
| |
12. |
Select MyGroup and press "Apply". |
| |
|
The Editor is dismissed and the name "MyGroup" is added to the text field next to the Group button. You could also have typed the name in directly. |
| |
13. |
Name the callback "doGoButton" and press "Add". |
| |
|
The new callback is shown in the list with curly braces enclosing periods ({...}) to indicate that this is a Smart Code callback. Figure 16-8 shows the defined callback. |

FIGURE 16-8 New Smart Code Callback
| |
14. |
Close the Callbacks dialog. |
| |
|
The definition of the callback is complete. Now we need to fill it in. |
| |
15. |
Save your design as tutorial.xd. |
| |
16. |
Display the Generate dialog and choose a target directory for your source files. |
| |
|
The target directory is shown at the top of the dialog. |
| |
17. |
Make sure that the "Stubs", "Code", "Externs", "Main program" and "Makefile" generate toggles are set. |
| |
|
The correct configuration of the Generate dialog is shown in Figure 16-9. For this tutorial we have changed the names of the files from the default ("untitled") to "tutorial". |
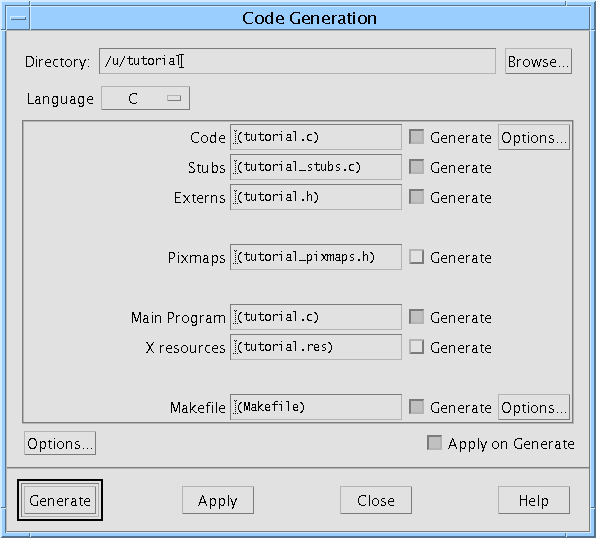
FIGURE 16-9 Generate Dialog
| |
18. |
Press the "Options..." button above "Generate" to display the Code Generation Options dialog. |
| |
19. |
Set the "Strings" option menu to "Code" and close this dialog, |
| |
|
For a simple tutorial, it is easier to generate label strings into the code file than to generate a separate resource file. |
| |
20. |
Now generate C code by pressing the "Generate" button. |
| |
|
Of course, you can generate C++ code. The example listings below use C. |
The directories and files shown in Figure 16-10 are generated.
"Get/Set Generated Code" on page 529 provides more information on the files generated for "Get/Set" Smart Code.
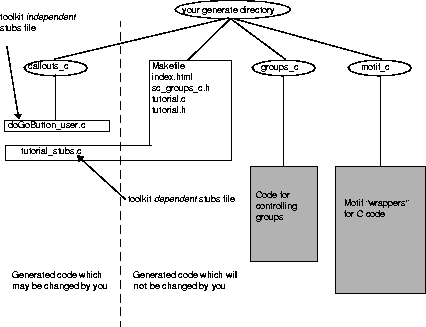
FIGURE 16-10 Files and Directories Generated For Tutorial
| |
22. |
Use your favorite editor to edit the file doGoButton_user.c in the directory callouts_c. |
| |
23. |
The callback itself is also called "doGoButton_user". |
#include <stdio.h>
#include "sc_groups_c.h"
void
doGoButton_user ( d, group, client_data)
sc_data_t * d;
MyGroup_t* group;
void* client_data;
{
}
Note - This routine is called from the button activate callback in tutorial_stubs.c.
| |
24. |
Add the following lines to "doGoButton_user": |
if (SC_GET(State, group->toggle1))
SC_SET(Value, group->text1, "The toggle is set");
else
SC_SET(Value, group->text1, "");
These few lines simply check whether the toggle is set or not. If it is set, then the text field displays "The toggle is set". If it is not, the text field is cleared.
| |
26. |
Make sure that you have the environment variable VISUROOT set to Sun WorkShop Visual's install directory and that you have your C compiler in your PATH. |
| |
|
See the Generating Code chapter in the main User Guide for more information on setting up prior to compiling. |
make
| |
|
in the directory where the files were generated. |
| |
28. |
Once your application has built, try running it. |
| |
29. |
Press the "Go" button with and without the toggle set. |
The tutorial is now complete. Although the functions you have added are very simple, you have established a framework within which your application can be extended very easily. It would now be much simpler to generate both a client and a server from your design by defining a Thin Client Smart Code callback. This is described in Chapter 17, "Thin Client Smart Code", starting on page 503. A step-by-step tutorial shows you how to do this in "Thin Client Smart Code Tutorial" on page 506.