


This chapter describes how to use Sun WorkShop Visual's C++ code generation facilities to add structure to application code and to create reusable widget hierarchies that correspond to C++ classes. These reusable hierarchies, known as definitions, appear on the widget palette and can be added to the hierarchy like any other widget. Although this chapter primarily covers C++, most of the material covered is also relevant to structured code generation in C with the exception of the sections on callback methods. Where they diverge the differences are noted.
This chapter is a tutorial. It contains step-by-step instructions that show you how to:
|

|
Create a C++ class corresponding to a widget hierarchy |
|
|
Use class methods to handle callbacks |
|
|
Use derived classes and preludes to add extra members to the generated class |
|
|
Modify or replace the base classes from which the Sun WorkShop Visual classes are derived |
|
|
Turn a class into a reusable definition and place the definition on the widget palette |
|
|
Modify the definition |
|
|
Create and modify an instance of the definition |
|
|
Use a derived class to extend an instance of the definition |
|
|
Override callback methods |
|
|
Generate and use resource files for definitions |
For best results, read this chapter at your computer while running Sun WorkShop Visual and do the steps as you read.
Further information on the subject of structured code generation can be found in Chapter 8 "Structured Code Generation and Reusable Definitions".
A C++ class in Sun WorkShop Visual corresponds to any widget with its children. When you designate a widget as a C++ class, Sun WorkShop Visual generates a class with that widget and its named descendant widgets as data members. This class can be extended by adding data members and member functions and thus provides a single location for properties that relate to the whole hierarchy.
Designating a C++ Class
Use the following steps to create a widget hierarchy containing a MenuBar widget and designate the MenuBar as a C++ class. Note that this example would not be compatible with Microsoft Windows code generation.
| |
1. |
Create two new directories, libmenu and cmd which have the same parent directory. |
| |
2. |
Change to the libmenu directory and start Sun WorkShop Visual. |
| |
3. |
Build the widget hierarchy shown in Figure 9-1. |
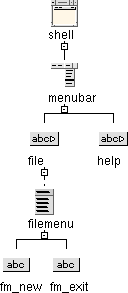
FIGURE 9-1 MenuBar widget hierarchy
Only explicitly named widgets are created as members of the class; unnamed widgets are local to the function that creates them. Naming the widgets makes them directly accessible from member functions of the class. Since they are protected members by default, they are also accessible from member functions of any derived class.
| |
4. |
Assign the widget names as shown in Figure 9-1. |
| |
5. |
Set the "Label" resource for each CascadeButton and PushButton to an appropriate string: "File", "Help", "New" and "Exit". |
| |
6. |
Use the Shell resource panel to designate the Shell widget as an Application Shell. Assign the title "Demo" to the Shell widget. |
This completes the example hierarchy. Now designate the menu bar as a C++ class:
| |
7. |
Select the MenuBar widget in the widget hierarchy. |
| |
8. |
Display the "Code generation" page of the Core resource panel. |
| |
9. |
Select "C++/Java class" from the "Structure" option menu, as shown in Figure 9-2. |
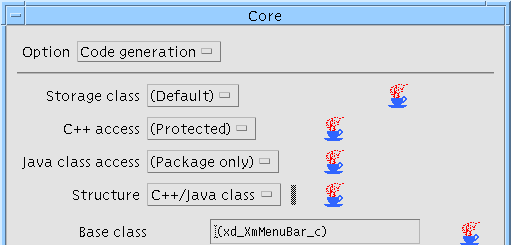
FIGURE 9-2 Designating a Widget as a Class
By default, Sun WorkShop Visual uses the variable name of the widget as the basis for a default class name and "Instantiate as" name and so the widget named menubar produces the class named menubar_c. The base class for menubar_c depends on the widget class; here it is xd_XmMenuBar_c. These names can be changed, as described later in this chapter.
Widget Member Access Control
The generated menubar_c class will contain the class widget (menubar) and all its named descendent widgets as members. Although, by default, they are protected members, you can change the access control on any widget by using the Core resource panel. Use the following steps to make the Help menu a public member of the class.
| |
1. |
Select the CascadeButton named help in the widget hierarchy. |
| |
2. |
Display the "Code generation" page of the Core resource panel. |
This is shown in Figure 9-3.
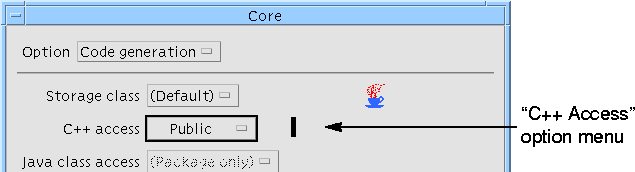
FIGURE 9-3 Member Access Control
| |
3. |
Select "Public" from the "C++ Access" option menu, then click on "Apply". |
C++ Class Code Generation
The code generated for the class consists of a class declaration in the generated Externs file and an implementation in the primary C++ code file. To generate these files for the example:
| |
1. |
Display the Generate dialog and make sure the "Language" option menu is set to C++. |
| |
2. |
Type menubar.cpp into the text box labelled "Code" and set the "Generate" toggle. |
| |
3. |
Type menubar.h into the text box labelled "Externs" and set the
"Generate" toggle. |
| |
4. |
Type menubar.cpp into the text box labelled "Main Program" and set the "Generate" toggle. |
| |
5. |
Type Makefile into the "Makefile" field and set the "Generate" toggle. |
| |
6. |
Click on the "Options" button next to the "Makefile" field. |
| |
|
This displays the Makefile options dialog. |
| |
7. |
In the Makefile Options dialog set both "New makefile" and "Makefile template" toggles on. Press the "Ok" button. |
| |
8. |
Press the "Options" button next to the "Code" field. |
| |
|
This produces the Code Options dialog, as shown in Figure 9-4. |
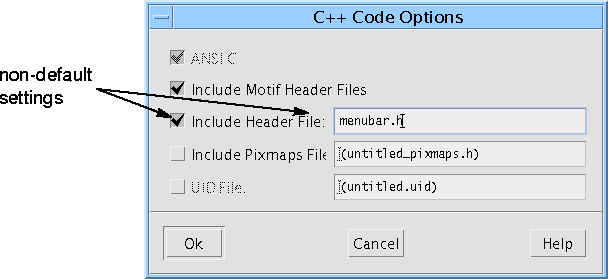
FIGURE 9-4 Code Options Dialog
| |
9. |
Type menubar.h into the text box labelled "Include Header File", as shown in Figure 9-4 and set the toggle. Press the "Ok" button. |
| |
10. |
Press the "Options" button at the bottom of the Generate dialog and set the options as shown in Figure 9-5. Ensure that the String resources are generated into the Code. Press the "Ok" button. |
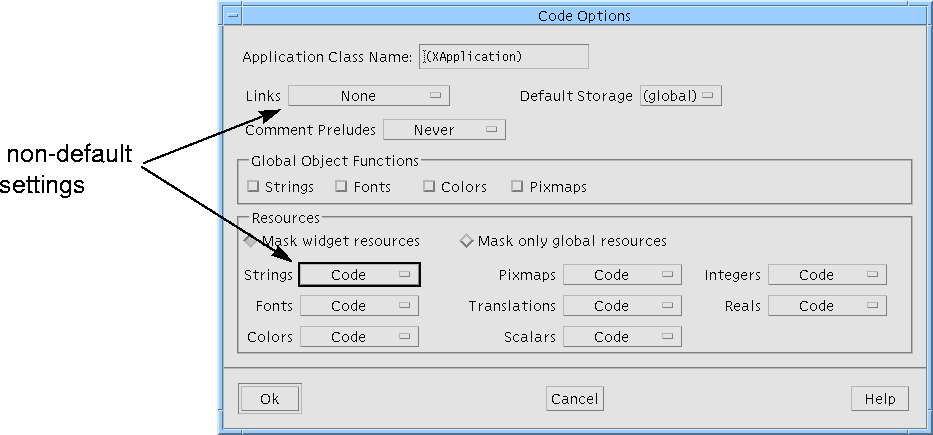
FIGURE 9-5 Code Generation Options for the menubar_c class
| |
11. |
Press "Generate" in the Generate dialog. |
The C++ externs file, menubar.h, contains the declaration for the class:
...
class menubar_c: public xd_XmMenuBar_c {
public:
virtual void create (Widget parent, char *widget_name =
NULL);
Widget help;
protected:
Widget menubar;
Widget file;
Widget filemenu;
Widget fm_new;
Widget fm_exit;
};
typedef menubar_c *menubar_p;
...
The new class for this MenuBar is based on an existing class, xd_XmMenuBar_c. The MenuBar and its named widget descendants are protected members, except for the widget help, which you designated as public.
The primary C++ file, menubar.cpp, contains the creation function for the new class. This function creates the MenuBar widget and its descendants. Note that this is not done in the constructor for menubar_c. This gives you the option of creating the widgets later than the class instantiation.
...
#include "menubar.h"
...
void menubar_c::create (Widget parent, char *widget_name)
{
Widget children[2]; /* Children to manage */
Arg al[64]; /* Arg List */
register int ac = 0; /* Arg Count */
XmString xmstrings[16]; /* temporary storage for
XmStrings */
if ( !widget_name )
widget_name = "menubar";
menubar = XmCreateMenuBar ( parent, widget_name, al,
ac);
_xd_rootwidget = menubar;
xmstrings[0] = XmStringCreateLtoR("File",
(XmStringCharSet)XmFONTLIST_DEFAULT_TAG);
XtSetArg(al[ac], XmNlabelString, xmstrings[0]); ac++;
file = XmCreateCascadeButton ( menubar, "file", al,
ac);
ac = 0;
...
children[ac++] = file;
children[ac++] = help;
XtManageChildren(children, ac);
ac = 0;
}
The menubar.cpp file also includes a creation function for the complete hierarchy. This function creates any widgets not in the class: in this case, just the Shell. It then creates an instance of the menubar_c class and calls menubar_c::create() to create the widget members of the class:
void create_shell (Display *display, char *app_name, int app_argc,
char **app_argv)
{
Widget children[1]; /* Children to manage */
Arg al[64]; /* Arg List */
register int ac = 0; /* Arg Count */
XtSetArg(al[ac], XmNallowShellResize, TRUE); ac++;
XtSetArg(al[ac], XmNtitle, "Demo"); ac++;
XtSetArg(al[ac], XmNargc, app_argc); ac++;
XtSetArg(al[ac], XmNargv, app_argv); ac++;
shell = XtAppCreateShell ( app_name, "XApplication",
applicationShellWidgetClass, display, al, ac );
ac = 0;
menubar = new menubar_c;
menubar->create ( shell, "menubar" );
XtManageChild ( menubar->xd_rootwidget());
}
Compiling the Generated C++ Code
Since you set the "Main program" toggle when you generated code, menubar.cpp also contains a main program and so the application can be built as it stands.
The C++ code generated by Sun WorkShop Visual is straightforward to build. The only special feature is that the base classes from which the generated classes are derived, such as xd_XmMenuBar_c, must be available. The $VISUROOT/src/xdclass/lib directory contains source for the default base classes. $VISUROOT/src/xdclass/h contains header files.
If the libxdclass.a library has not yet been built, use the following steps to build it using the supplied Makefile:
| |
1. |
Go to the src/xdclass/lib directory in your Sun WorkShop Visual installation. |
| |
2. |
Set VISUROOT to the path of the root of your Sun WorkShop Visual installation. |
When this completes, the libxdclass.a library is ready to use.
You are now ready to build the program using the generated Makefile.
Note - Because the generated Makefile contains references to $VISUROOT, you must set this environment variable before building the program.
| |
4. |
To build the menubar program, type: make |
| |
5. |
To run the application, type: menubar |
The application looks and behaves exactly as it would if there were no classes in it.
So far, this example has shown how to designate a widget hierarchy as a class and the form of the code that is generated. At this stage, it does not exploit the fact that the widget hierarchy is a class.
Note - This section, and the following three sections, are specific to C++ programming. When using C structures the conventional callback mechanism applies. If you are not doing C++ programming you might like to skip to "Creating a Definition" on page 303.
Callbacks and Member Functions
Sun WorkShop Visual provides a simple mechanism that allows you to specify class member functions as callback functions. In Sun WorkShop Visual these are known as callback methods. The technique used is discussed fully in "Callback Methods" on page 264.
Specifying a Callback Method
The callbacks dialog lets you specify the member functions that are invoked in response to events. When you specify a callback method for a particular widget, the method which is invoked is that which belongs to the most immediate class-designated ancestor of the widget (perhaps the widget itself). For example, callback methods on the menu buttons in the MenuBar example invoke member functions of the menubar_c class.
Use the following steps to declare a class method on the fm_new button:
| |
1. |
Select the fm_new button. |
| |
2. |
Invoke the Callbacks dialog by selecting "Callbacks" from the "Widget" menu or pressing the Callbacks button on the toolbar. |
| |
3. |
Select "Activate" from the list of callback lists. |
| |
4. |
In the "Method name:" field, type OnNew |
| |
|
This adds OnNew to the list of local methods, as shown in Figure 9-6: |
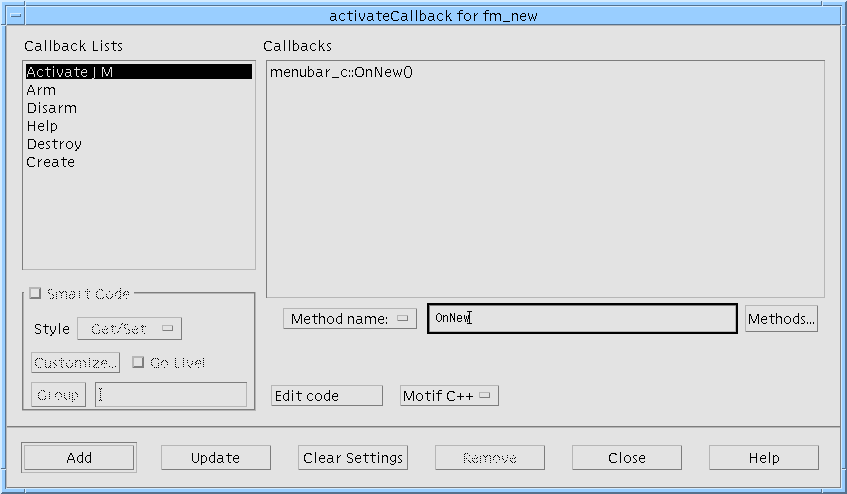
FIGURE 9-6 Specifying a Callback Method
This designates the member function menubar_c::OnNew() as the method that handles the Activate callback of the button fm_new. When you do this, Sun WorkShop Visual also declares the method on the parent widget menubar if you haven't already declared it.
Use a similar procedure to enter a callback method on the fm_exit button:
| |
6. |
Select the fm_exit button in the widget hierarchy. |
| |
7. |
Select "Activate" from the Callbacks dialog. |
| |
8. |
In the "Method name:" field, type: OnExit |
| |
10. |
Close the Callbacks dialog |
The class now has two callback methods, menubar_c::OnNew() and menubar_c::OnExit().
Generating Code for Callback Methods
Using a callback method from within a class causes Sun WorkShop Visual to generate declarations for two additional member functions, a complete implementation for one of them and a stub for the other.
| |
1. |
Display the Generate dialog and make sure the "Language" option menu is set to C++. |
| |
2. |
Type menubarS.cpp into the text box labelled "Stubs" and set the "Generate" toggle. |
| |
3. |
Display the Makefile Options dialog. |
| |
4. |
Set the "New makefile" toggle off and the "Makefile template" toggle on. Press the "Ok" button. |
| |
5. |
Set the Makefile "Generate" toggle in the Generate dialog. |
| |
6. |
Press the "Generate" button. |
Look at the class declaration in menubar.h. Two new member functions have been added for each callback method:
class menubar_c: public xd_XmMenuBar_c {
public:
...
static void OnExit( Widget, XtPointer, XtPointer );
virtual void OnExit( Widget, XtPointer );
static void OnNew( Widget, XtPointer, XtPointer );
virtual void OnNew( Widget, XtPointer );
};
Note that only the static versions of these functions have the argument list expected by an Xt callback. Therefore, when Xt invokes the callback method menubar_c::OnNew(), the C++ compiler selects the static version based on the argument list.
Note the following line in the creation function in menubar.cpp:
XtAddCallback (fm_new, XmNactivateCallback, OnNew, (XtPointer)
this);
The code for the static function is also generated into menubar.cpp. This function simply invokes the non-static virtual member OnNew(Widget, XtPointer), using the instance pointer passed in as client data:
void menubar_c::OnNew( Widget widget, XtPointer client_data,
XtPointer call_data )
{
menubar_p instance = (menubar_p) client_data;
instance->OnNew ( widget, call_data );
}
You provide the code for the non-static virtual member function OnNew(Widget, XtPointer). A stub for this function is generated to menubarS.cpp:
void
menubar_c::OnNew (Widget w, XtPointer xt_call_data )
{
XmAnyCallbackStruct *call_data = (XmAnyCallbackStruct*)
xt_call_data;
}
Sun WorkShop Visual generates code according to this pattern for all the callback methods that are used in a hierarchy. In this example, similar code is generated for OnExit().
OnNew() and OnExit() are invoked from the fm_new and fm_exit PushButtons but the functions are methods of the menubar_c class. This means that all the callback functions that define the behavior of widgets in the class are kept in one place. It also means that all callback functions have access to the instance data for the class and can use it to share information.
Implementing a Callback Method
The application behavior is added by implementing the callback methods. You can edit the callback method using Sun WorkShop Visual's editing mechanism. Use the following steps to implement the OnExit() method:
| |
1. |
Select the fm_exit button. |
| |
2. |
Display the Callbacks dialog and select the OnExit() callback method. |
| |
3. |
Press the "Edit code" button. |
| |
4. |
Complete the implementation of menubar_c::OnExit() as: |
void
menubar_c::OnExit (Widget w, XtPointer xt_call_data )
{
XmAnyCallbackStruct *call_data = (XmAnyCallbackStruct*)
xt_call_data;
exit(0);
}
| |
5. |
Close the Callbacks dialog. |
| |
6. |
To build the menubar program, type: make |
| |
7. |
To run the application, type: menubar |
| |
8. |
Select the "Exit" button from the File Menu. |
| |
|
Verify that the program exits. |
Editing Methods Attributes
Callback methods have two attributes: their access level and whether they are designated pure virtual. The access level determines whether the method is accessible from derived classes and external code. A method can be designated pure virtual to indicate that it has no implementation in the base class, which must be sub-classed to provide an implementation. See "C++ Classes" on page 260 for further details.
The attributes are set initially to default values when the callback method is first specified. This can be done on any widget that has a class ancestor or is a class itself. However, they can only be changed on the root widget for the class. For example, the OnNew() callback method of the class menubar_c can only be edited via the menubar widget itself.
| |
1. |
Select the menubar widget in the widget hierarchy. |
| |
2. |
Select "Method declarations" from the "Widget" menu to display the method declarations dialog. |
| |
|
This shows a list of the callback methods declared for the class (rather than a list of the methods invoked for any particular event). You can use this panel to edit the callback methods and to declare methods that are not invoked by events in this class but which may be invoked in a derived class. |
| |
3. |
Select the method OnNew() and set the "Pure virtual" toggle. |
| |
4. |
Click on the "Add/Update" button to apply the change. The result is shown in Figure 9-7. |
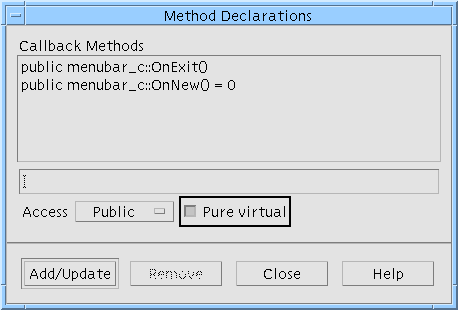
FIGURE 9-7 Editing a Callback Method
| |
5. |
Generate the code again. |
You do not have to provide an implementation for a pure virtual member function although it is legal to do so. Therefore:
| |
6. |
Copy the stubs file, menubarS.cpp, to temp.cpp. |
| |
7. |
Edit the stubs file, menubarS.cpp, to remove the stub for OnNew(), i.e. the code between the curly braces. |
| |
8. |
Build the menubar program, as before. |
The C++ compiler produces an error message like:
"menubar.cpp" line 100: Error: Cannot create a variable for abstract
class menubar_c
The error occurs because the menubar_c class contains a pure virtual function and therefore cannot be instantiated. It is now only useful as a base class. Later in this chapter you will use this class as a basis for a derived class.
| |
9. |
Copy the file temp.cpp to menubarS.cpp and then remove temp.cpp. |
This section and the following one present two techniques for adding members to Sun WorkShop Visual's generated classes. The two techniques are:
|
|
Using Sun WorkShop Visual's preludes mechanism |
|
|
Generating a derived class |
Note - This section is specific to C++ programming.
Adding Class Members as a Prelude
The easiest way to add a small number of members is to use the preludes mechanism. This lets you type fragments of code in Sun WorkShop Visual and have them passed into the generated code.
Note - It is possible to type preludes directly into the generated code using Sun WorkShop Visual's edit mechanism. See "Customizing the Generated Files: Preludes" on page 246 for details on doing this.
For this example, we shall add the prelude in the Preludes dialog before generating the code.
| |
1. |
Select the menubar widget in the widget hierarchy. |
| |
2. |
Pull down the Widget Menu and select "Code preludes". |
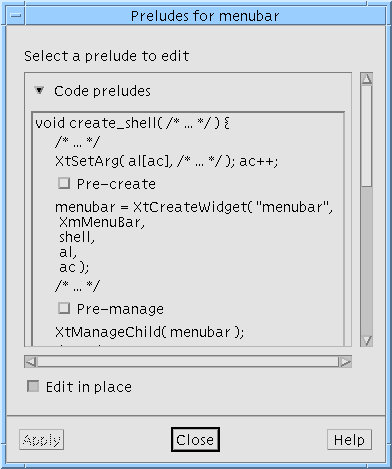
FIGURE 9-8 Code Preludes dialog
| |
3. |
Unset the "Edit in place" toggle. |
| |
|
Doing this expands the Preludes dialog so that an editing area appears on the right. This is where you will add the prelude. |
| |
4. |
Select the "Protected methods" toggle in the text labelled "Method Preludes". (You may have to scroll down to find this.) |
| |
5. |
In the text area on the right, press the TAB key and then type: |
int modified;
| |
6. |
Click on "Apply" and then "Close". |
To see the result of this operation:
| |
7. |
Generate the code again. |
| |
8. |
Examine menubar.h and verify that the class menubar_c now has the additional member. |
The Code Preludes dialog is designed for making small insertions to the generated code. To add substantial functionality, it is often better to write a new class derived from the generated class. The logical gap between the two classes can be used to add members and provide implementations for virtual functions.
Note - This section is specific to C++ programming.
By default, Sun WorkShop Visual derives the name of a C++ class from the variable name of the root widget and so the class for the widget menubar is menubar_c:
class menubar_c: public xd_XmMenuBar_c {
...
};
When Sun WorkShop Visual generates code to create an instance of the class, it uses the same name:
menubar = new menubar_c;
You can change the default behavior so that Sun WorkShop Visual declares the generated class under one name and creates the instance under another, for example:
menubar = new mymenubar_c;
To make this change, use the "Instantiate as" field on the Code Generation page of the Core resource panel:
| |
1. |
Select the menubar widget in the widget hierarchy. |
| |
2. |
Display the "Code generation" page of the Core resource panel. |
| |
3. |
Set the "Instantiate as" name to mymenubar_c, as shown in Figure 9-9. |
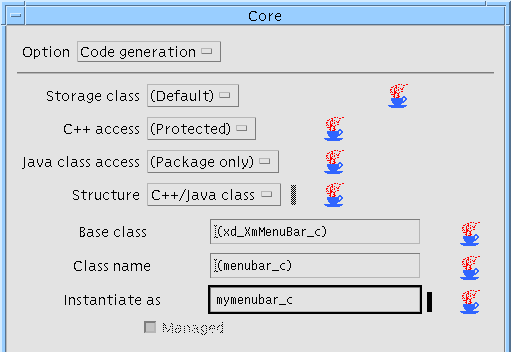
FIGURE 9-9 Changing "Instantiate as" Name
| |
4. |
Click on "Apply" and then "Close". |
| |
5. |
Generate the code again. |
The original class, menubar_c, is declared exactly as before. However, when Sun WorkShop Visual generates code to create an instance of the class, it uses the "Instantiate as" name:
menubar = new mymenubar_c;
Writing the Derived Class
Sun WorkShop Visual doesn't generate code for the mymenubar_c class. You must provide a header file which declares the class and code to implement any methods it contains. There are no limitations on the new class except that it must be derived from menubar_c. For this example use the sample code given below.
| |
1. |
In a new file named mymenubar.h, write the class declaration for the derived class mymenubar_c. |
Use the following code:
#ifndef _mymenubar_h
#define _mymenubar_h
#include <menubar.h>
class mymenubar_c: public menubar_c {
public:
// Constructor
mymenubar_c();
//Provide implementation for inherited pure virtual
void OnNew(Widget, XtPointer);
};
#endif
Because the new class is derived from menubar_c, it inherits all widget members and member functions you declared for that class in Sun WorkShop Visual. You can add any number of new members. Here we add a constructor function and an implementation of the OnNew() virtual callback method.
| |
2. |
In a new file named mymenubar.cpp write the class implementation for the derived class mymenubar_c. |
Use the following code:
#include <mymenubar.h>
mymenubar_c::mymenubar_c()
{
modified = TRUE;
}
void
mymenubar_c::OnNew(Widget, XtPointer)
{
// Reset modified flag
if (modified)
modified = FALSE;
}
This completes all the code for the class. Note that the generated C++ code module mymenubar.cpp needs to include the header file for the derived class mymenubar_c. This is done using the "Include Header File" in the Generate dialog.
| |
3. |
Display the Generate dialog. |
| |
4. |
Press the "Options" button next to the "Code" field. |
| |
|
This displays the Code Options dialog. |
| |
5. |
Set the "Include Header File" field to mymenubar.h, set the associated toggle and click on "Ok". |
The Code Options dialog containing the new file name is shown in Figure 9-10:
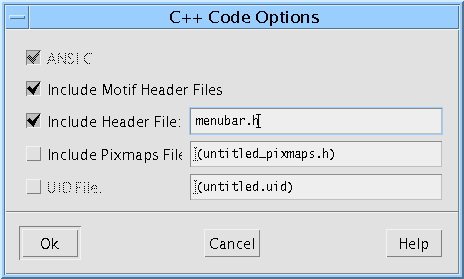
FIGURE 9-10 Changing the Declarations Header
| |
7. |
Add the following lines to the Makefile before the line that reads "XD_ALL_C_SOURCES=...". |
XD_CC_SOURCES=mymenubar.cpp
XD_CC_OBJECTS=mymenubar.o
| |
8. |
Add the following lines at the end of the Makefile: |
| |
|
mymenubar.o:mymenubar.cpp |
$(CCC) $(CCFLAGS) $(CPPFLAGS) -c mymenubar.cpp
Note - The indentation of the compiler instruction line is deliberate, you must have this too.
| |
10. |
Build the menubar program, as before. |
The application now uses the class mymenubar_c and invokes its OnNew() method when the "New" button in the "File" menu is pressed. To check this, you can extend mymenubar_c::OnNew() to print out a message.
You should note that actual parameters for the constructor can be supplied with the class name. For example, setting the "Instantiate as" string to mymenubar_c ("Hello World") will cause Sun WorkShop Visual to generate:
menubar = new mymenubar_c ( "Hello World" );
Once a hierarchy of widgets has been encapsulated as a class, you can re-use it in other designs by turning it into a definition. A definition is a reusable group of widgets which can be added to the Sun WorkShop Visual widget palette. Selecting a definition from the palette creates an instance of that structure in the design. When Sun WorkShop Visual generates code containing an instance, the definition's create function is called to create the widgets.
Prerequisites
A hierarchy of widgets can become a definition provided that:
|
|
The root widget has a variable name |
|
|
The root widget has been designated as a C++ class or a C Data Structure |
|
|
The root widget is not part of another definition |
|
|
The widget hierarchy does not contain a definition |
|
|
The widget hierarchy does not contain any global or static widgets |
Designating a Definition
Use the following steps to designate the MenuBar class as a definition:
| |
1. |
Select the menubar widget in the hierarchy. |
| |
2. |
Pull down the Widget Menu and set the "Definition" toggle. |
| |
|
The menubar widget and its descendants are enclosed in a colored box to indicate that they constitute a definition. |
| |
3. |
Save the design as menubar.xd. |
Note - You must save the design containing the definition before adding it to the palette. Sun WorkShop Visual uses the saved design file each time the definition is used. Although you can have multiple definitions in a single design file, it is easier to keep track if each file contains only one definition.
Creating a definition freezes the widgets within it. Their resource panels are disabled and you cannot add widgets or change widget names. You can edit the widgets that make up a definition only by temporarily removing the definition. This should be done with caution to avoid conflicts with designs that use the definition. For details, see "Modifying a Definition" on page 278.
This section explains how to add the new definition to the widget palette.
| |
1. |
Select the menubar widget in the design hierarchy. |
| |
2. |
Choose "Edit definitions" from the Palette Menu. |
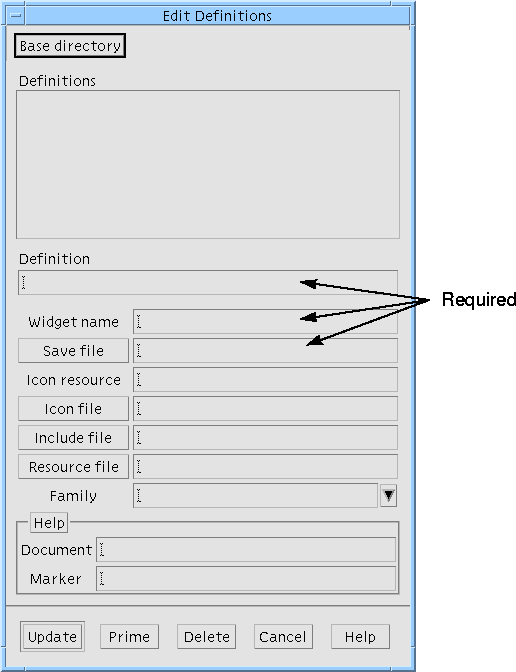
FIGURE 9-11 Adding a Definition to the Palette
You can use this dialog to add a definition (if it has been "marked" as one), delete a definition or edit an existing definition. To add a definition, you must supply:
|
|
Definition - A definition name |
|
|
Widget name - The name of the root widget of the definition |
|
|
Save file - The name of a saved design file (.xd) |
Other attributes are described in "Designating a Definition" on page 274.
Attributes not set at creation time can be set later. For example, you can test and debug a definition before designing its icon.
| |
3. |
Press the "Prime" button. |
| |
|
This fills in the "Save file", "Definition", "Widget Name" and "Include file" fields. |
Note that the "Instantiate as" name you specified for the MenuBar applies each time the definition is used.
| |
4. |
Enter menubar.xpm in the "Icon file" field. |
The icon is optional. If you do not specify an icon, Sun WorkShop Visual uses the name of the root widget as a label in a PushButton on the widget palette. If you specify an icon file and the icon file does not exist, the Sun WorkShop Visual icon of the widget at the root of the definition is displayed on the palette,
You can use the Sun WorkShop Visual pixmap editor to design an icon for your definition. It should use an area of color "none" which is used to show the selection in the widget hierarchy. See "Using the Pixmap Editor" on page 165 for details on the pixmap editor and "Palette Icons" on page 707 for details on creating new widget palette icons.
Note that you can also specify the icon via the Sun WorkShop Visual resource file. To do this, specify the name of the Sun WorkShop Visual resource in the "Icon resource" field and set that resource to a file name in the Sun WorkShop Visual resource file.
The other fields in the Edit Definition dialog are discussed later in this chapter.
| |
|
The icon you specified appears on the Sun WorkShop Visual widget palette. It becomes active whenever you select a widget that can have a MenuBar child. |
The code for a definition has two parts: the declaration in the public header file (the externs file) and the code module containing the implementation. The code module does not have to be public in order to compile applications containing instances; it can be made available in compiled form in a library.
Use the steps in this section to generate only the code for the definition, i.e. without the Shell or other widgets and without a main program.
To mark the Shell widget so that no code is generated for it:
| |
1. |
Select the shell widget in the hierarchy. |
| |
2. |
Display the Core resource panel and select the "Code generation" page. |
| |
3. |
Set the "Structure" option menu to "Children only" and then click on "Apply" followed by "Close". |
After you do this, Sun WorkShop Visual ignores the Shell and any of the Shell's children that are not designated as C++ classes, functions, or data structures. Code is generated only for the MenuBar and its descendants.
You must also suppress generation of the main program:
| |
4. |
Open the Generate dialog. |
| |
5. |
Unset the "Generate" toggle for "Main program". |
| |
6. |
Ensure that the "Generate" toggles for "Code", "Stubs" and "Externs" are on and that menubar.h is specified as the Externs file name. |
| |
7. |
Unset the "Generate" toggle for "Makefile". |
This completes the process needed to create a definition and the code for the corresponding class. It can now be used in an application. The normal way to make the implementation available for reuse is as a library:
| |
10. |
Use the following commands to create the library: |
make menubar.o
make menubarS.o
make mymenubar.o
ar r libmenu.a *.o
A definition can be used in the same way as a widget on the palette. Clicking on the palette button creates an instance of the definition. Sun WorkShop Visual copies the definition's hierarchy into the tree where it can be modified and extended. In the generated code, Sun WorkShop Visual will include a call to the definition's creation function to create the instance.
Use the following steps to build a new design using the menubar definition.
| |
1. |
Select "New" from the File menu. |
| |
2. |
Click on the following palette icons: Shell, MainWindow and your new menubar definition. |
| |
|
Your new definition is appended to the widget palette and has the icon you specified in Step 4 on page 306. |
| |
|
This produces the widget hierarchy shown in Figure 9-12. |
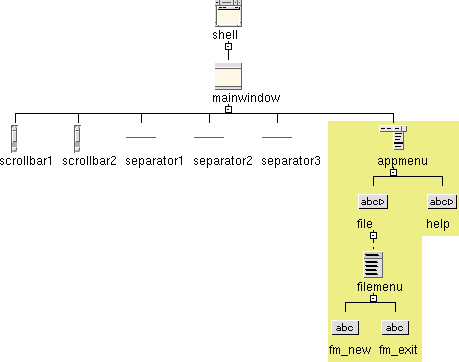
FIGURE 9-12 Hierarchy Containing an Instance of a Definition
The components of the instance are enclosed in a colored box to indicate that they form a single entity. All widgets except the root widget are given the same names they had in the original definition. The root widget is assigned a default name of the form <widgetclass><n>. For reliable code, assign it an explicit name.
| |
3. |
Name the root widget of the instance, the Shell and the MainWindow as shown in Figure 9-12. |
| |
4. |
Use the Shell resource panel to designate the Shell widget as an ApplicationShell. |
You can modify an instance after you have created it provided that the modifications can be done in the generated code. For example, you can set resources on widgets or add children to widgets only if they have public access. You cannot remove widgets or change their names. The root widget is an exception. Because the root widget of the instance can be accessed through the member function xd_rootwidget(), it can always be modified.
In our example, all components of the definition are protected except for the help button. This means only the help button's label can be changed. Similarly, it is possible to add extra widgets under the help button but not under the filemenu menu.
| |
1. |
Select the help widget in the widget hierarchy. |
| |
2. |
Click on the Menu icon in the widget palette and then on the PushButton icon. |
| |
|
This adds a single item menu under the help CascadeButton. |
FIGURE 9-13 Extending an Instance of a Definition
| |
4. |
Set the label for the hm_about button to "About...". |
Currently, you cannot modify other widgets in the definition. For example, you cannot add buttons to filemenu. However, if you create a subclass from a definition, you can modify protected as well as public widgets. This technique is discussed in the next section.
Because most members of the class corresponding to the definition are protected, they cannot be accessed in an instance of the definition. There are two ways to address this:
|
|
modify the original definition to make the members public |
|
|
designate the instance as a class (Because the instance class is derived from the definition class, it has access to the protected members) |
The second approach maintains better encapsulation and lets you exploit the callback methods.
| |
1. |
Select the MenuBar widget, appmenu, in the widget hierarchy. |
| |
2. |
Display the "Code generation" page of the Core resource panel. |
| |
3. |
Select "C++ Class" from the "Structure" option menu and then click on "Apply". Close the resource panel. |
| |
|
The MenuBar widget is designated as a class, as in Figure 9-14. This class is derived from the class that corresponds to the definition. |
FIGURE 9-14 Creating a Derived Class from a Definition
Because member functions of the class can access the protected members of mymenubar_c, extra widgets can now be added anywhere in the hierarchy.
| |
4. |
Select the filemenu widget in the widget hierarchy. |
| |
5. |
Add two extra PushButtons to the menu and label them "Open..." and "Save...". |
| |
6. |
Set the variable names of the new buttons to fm_open and fm_save. |
| |
7. |
Use mouse button 1 to drag the new buttons into the positions shown in Figure 9-15. |
FIGURE 9-15 Extending a Derived Class
The order of a definition cannot be changed. This means that, while you can move new widgets into the definition, you cannot move widgets which are part of the definition.
| |
8. |
Select fm_open in the hierarchy. |
| |
9. |
Display the Callbacks dialog either by selecting "Callbacks" from the "Widget" menu or pressing the Callbacks button on the toolbar. |
| |
10. |
Select "Activate" from the list of callback lists. |
| |
11. |
In the "Method name:" field, type: OnOpen |
| |
13. |
Repeat the above steps to set the Activate callback methods for fm_save to OnSave. |
| |
14. |
Close the Callbacks dialog. |
This technique is also valid for C structures. Sun WorkShop Visual will generate a new structure which is an extension of the definition's structure.
The class appmenu_c, which corresponds to the MenuBar, has four callback methods: OnNew() and OnExit(), which are inherited, and OnOpen() and OnSave() which are defined by appmenu_c itself. However, the inherited methods can be overridden so that the derived class has different behavior from the base class.
Note - This section is specific to C++ code.
| |
1. |
Select the widget appmenu in the widget hierarchy. |
| |
2. |
Select "Method declarations" from the "Widget" menu. |
FIGURE 9-16 Method Declarations
Note that OnSave() and OnOpen() are local to appmenu_c, whereas OnExit() and OnNew() are inherited from menubar_c. Inherited methods are shown in square brackets.
| |
3. |
In the text field, type: OnExit |
| |
4. |
Make sure the "Pure virtual" toggle button is unset and then press "Add/Update". |
| |
|
OnExit() is added to the list of local methods. It can now be overridden. |
Implementing Overridden Methods
Overridden methods are implemented by completing the stubs generated by Sun WorkShop Visual:
| |
1. |
Display the Generate dialog and make sure the "Language" option menu is set to C++. |
| |
2. |
Replace the text in the Directory field by the absolute path of your cmd directory, e.g. /u/mgs/TUTORIAL/cmd. |
| |
|
This specifies the name of the directory into which the code will be generated. |
| |
3. |
Type: app.cpp into the text box labelled "Code" and set the "Generate" toggle. |
| |
4. |
Type: appS.cpp into the text box labelled "Stubs" and set the "Generate" toggle. |
| |
5. |
Type: app.h into the text box labelled "Externs" and set the
"Generate" toggle. |
| |
6. |
Type: app.cpp into the text box labelled "Main Program" and set the "Generate" toggle. |
| |
7. |
Type: Makefile into the "Makefile" field and set the "Generate" toggle. |
| |
8. |
In the Makefile Options dialog set both "New makefile" and "Makefile template" toggles on and press the "Ok" button. |
| |
9. |
Press the "Options" button next to the "Code" field. |
| |
10. |
Type: app.h into the text box labelled "Include Header File", set the toggle and press the "Ok" button. |
| |
11. |
Press the "Options" button at the bottom of the Generate dialog and set the options as shown in Figure 9-17. |
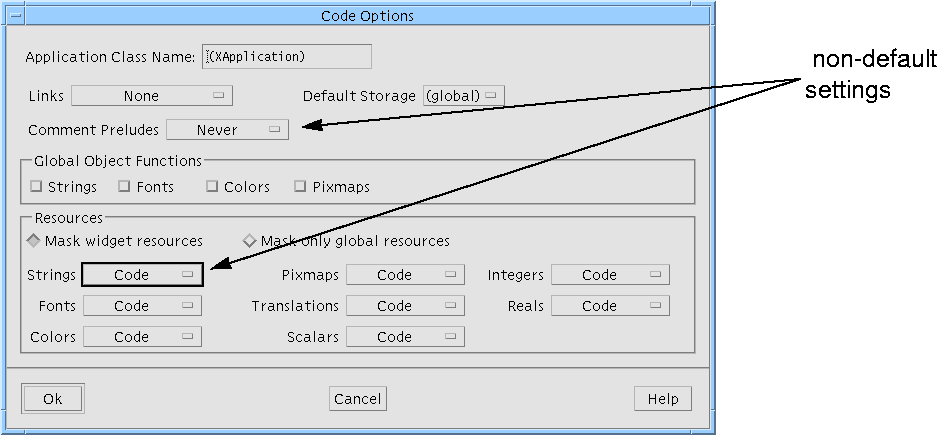
FIGURE 9-17 Code Generation for the Application
| |
13. |
Press "Generate" and close the Generate dialog. |
| |
14. |
Complete the stubs file, appS.cpp, as follows: |
...
#include <iostream.h>
void
appmenu_c::OnExit (Widget w, XtPointer xt_call_data)
{
...
if (modified)
XBell(XtDisplay(w), 100);
else
exit(0);
}
void
appmenu_c::OnSave (Widget, XtPointer xt_call_data)
{
...
cout << "Saving..." << endl;
modified = FALSE;
}
void
appmenu_c::OnOpen (Widget, XtPointer xt_call_data)
{
...
cout << "Opening..." << endl;
modified = TRUE;
}
This implementation of OnExit() overrides the implementation in the definition. The function XBell() rings the bell on the X server. OnSave() and OnOpen() are stub functions that print appropriate messages and update the modified flag.
The functionality of the application's menubar is now:
|
|
The modified flag is initially set TRUE in the constructor for the class. It is set TRUE by "Open" and set FALSE by "New" and "Save" |
|
|
"Exit" terminates the application unless the modified flag is set, in which case it rings the bell |
|
|
"Open" and "Save" produce informative messages on stdout |
| |
15. |
Edit the Makefile and make the following changes: |
MOTIFLIB=-lmenu -lXpm -lXm -lXt -lX11
CFLAGS=-I. ${XINCLUDES} -I${XPMDIR} -I../libmenu \
-L../libmenu
| |
17. |
Build the program by typing make |
| |
18. |
Run the application and verify that the menu behaves as expected. |
| |
19. |
Save the design as app.xd in the cmd directory. |
Resource values for widgets that are components of definitions can be either hard-coded or specified in resource files. When you specify a resource file for a definition, Sun WorkShop Visual includes that file in the resource file for any design containing an instance of the definition.
So far in this example, all resources have been hard-coded. Use the following steps to regenerate the menubar definition with string resources in a resource file:
| |
1. |
Open the design file menubar.xd from the libmenu directory. |
| |
2. |
Display the Generate dialog and make sure the "Language" option menu is set to C++ and the Directory is set to the libmenu directory. |
| |
3. |
Display the Code Options dialog from the Generate dialog and set the "Strings" option menu to "Resource file". Press the "Ok" button. |
| |
|
This removes hard-coded string resources such as the labels on buttons. |
Now generate a resource file containing the string resources:
| |
4. |
In the Generate dialog, type menubar.res into the "X Resources" field and set the corresponding "Generate" toggle. |
| |
5. |
Check that the "Generate" toggle for the "Code" field is on and the "Generate" toggles for the "Main program" and "Makefile" are off. |
| |
8. |
In the libmenu directory, type: make clean |
| |
|
This removes the old object files. |
Editing the Definition
In the preceding steps, you changed the generated code for the definition so that string resources are kept in a resource file. Now edit the menubar definition and specify a resource file:
| |
1. |
Select "Edit definitions" from the Palette Menu. |
| |
2. |
On the Edit Definitions dialog, select menubar from the scrolled list of definitions. |
| |
3. |
In the "Resource file" field, type: |
../libmenu/menubar.res
| |
|
This step saves the change to the definition in your definitions file ($HOME/.xddefinitionsrc). |
Note - You can use the Edit Definition dialog to specify a resource file at any time. The original menubar.xd design does not have to be loaded to perform this step.
Instances and Definition Resource Files
When you specify a resource file for a definition, Sun WorkShop Visual #includes that file in the resource file for any design that contains an instance of the definition. The Xlib mechanisms that read the resource file interpret this directive and use it to find the resource file for the definition. Use the following steps to try this in the app.xd application.
| |
1. |
Open the design file app.xd from the cmd directory. |
| |
2. |
Display the Generate dialog and make sure the "Language" option menu is set to C++. |
| |
3. |
Type: app.res into the "X Resources" field and set the corresponding "Generate" toggle. |
| |
4. |
Set the "Generate" toggles for "Code" and "Main Program". |
| |
5. |
Check that the "Generate" toggles for "Stubs", "Externs" and "Makefile" are off. |
| |
6. |
Display the Code Options dialog from the Generate dialog and set the "Strings" option menu to "Resource file". Press the "Ok" button. |
The X resource file for the application contains the following directive:
! Generated by Sun WorkShop Visual
#include "../libmenu/menubar.res"
Xlib interprets this #include directive as giving a pathname relative to the directory containing the application resource file. For details, see the Xlib documentation.
| |
8. |
Build the program by typing: make |
| |
9. |
Set the environment variable XENVIRONMENT to the name of the resource file. |
| |
|
The exact syntax for doing this will differ depending on which shell you are using. For a C shell, enter: |
setenv XENVIRONMENT app.res
| |
|
For a Bourne shell, enter: |
XENVIRONMENT=app.res; export XENVIRONMENT
Note - There are other ways to get X to recognize your X resource file. To find out what they are, you will need to look them up in a book about the X Window System. See Appendix E, "Further Reading" for the names of some books you may wish to try.
| |
10. |
Run the application and verify that the menu behaves as expected. |
| |
11. |
Save the design and exit from Sun WorkShop Visual. |